A concrete road gets laid with the right grade of concrete, compacted properly, and cured on schedule — and it still, weeks or months later, breaks out in a fine web of surface cracks. Left alone, that pattern doesn't stay cosmetic. The thin cracked layer debonds from the slab beneath it, and the aggregate underneath starts showing through the surface. This is one of the most common — and most misunderstood — defects on concrete roads, because the concrete itself is rarely the problem. The failure sits in a layer a few hundred microns thick, sitting on top of it.
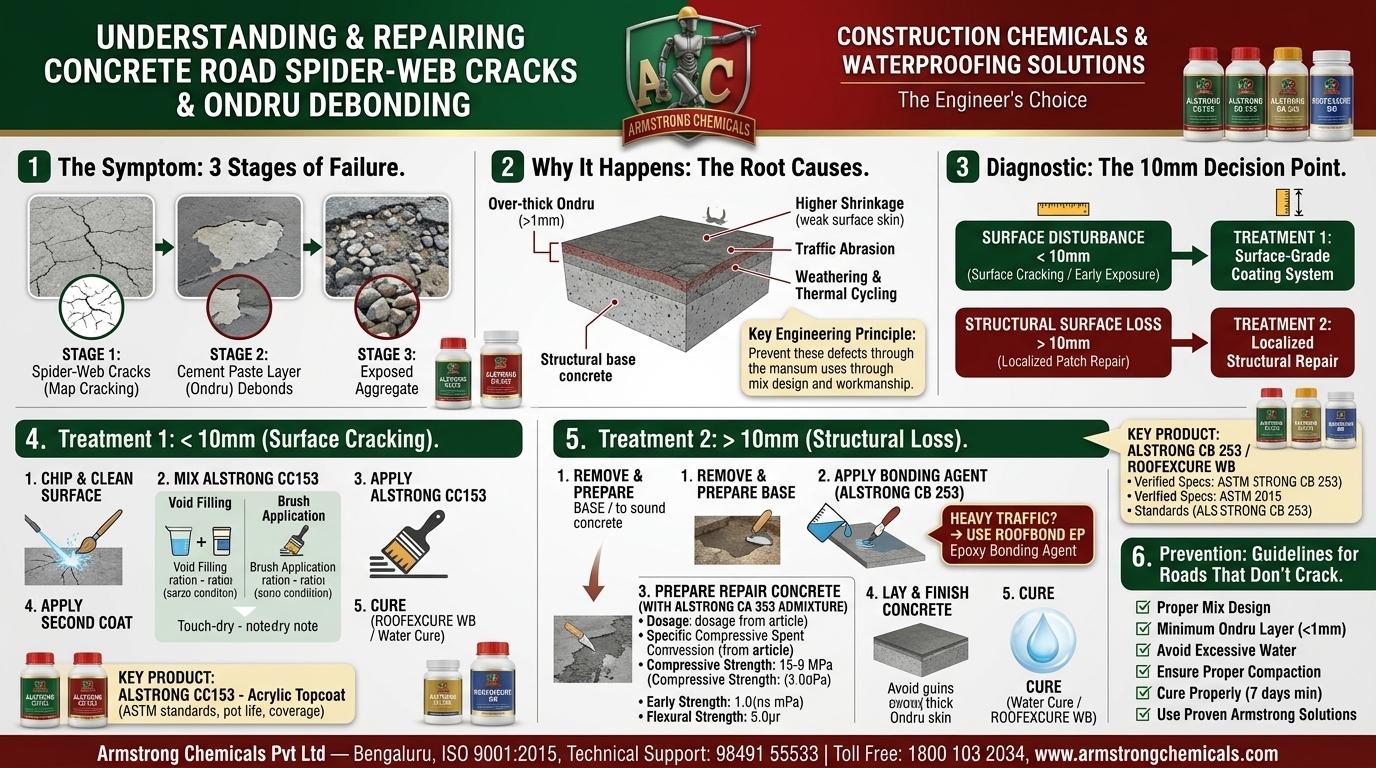
The Symptom: Three Stages of the Same Failure
The damage progresses in a fairly predictable sequence, and recognising which stage a stretch of road is in decides how it should be treated:
Stage 1 — Spider-web cracks on the surface. A fine, random, interconnected crack pattern appears across the slab — often called map cracking or crazing. At this stage the cracks are shallow and the slab underneath is still sound.
Stage 2 — The cement paste layer debonds. Traffic abrasion, weathering and thermal expansion/contraction work into those surface cracks. The thin cement-rich layer at the top — the “Ondru” — loses its bond to the structural concrete below and starts to lift and flake away in small patches.
Stage 3 — Aggregate is exposed. Once the debonded paste layer is gone, the coarse aggregate embedded in the concrete is left standing proud of the surface. The road now looks pitted and worn even though the structural slab underneath may still be entirely sound.
Why It Happens: The Problem Isn't the Concrete, It's the Skin On Top
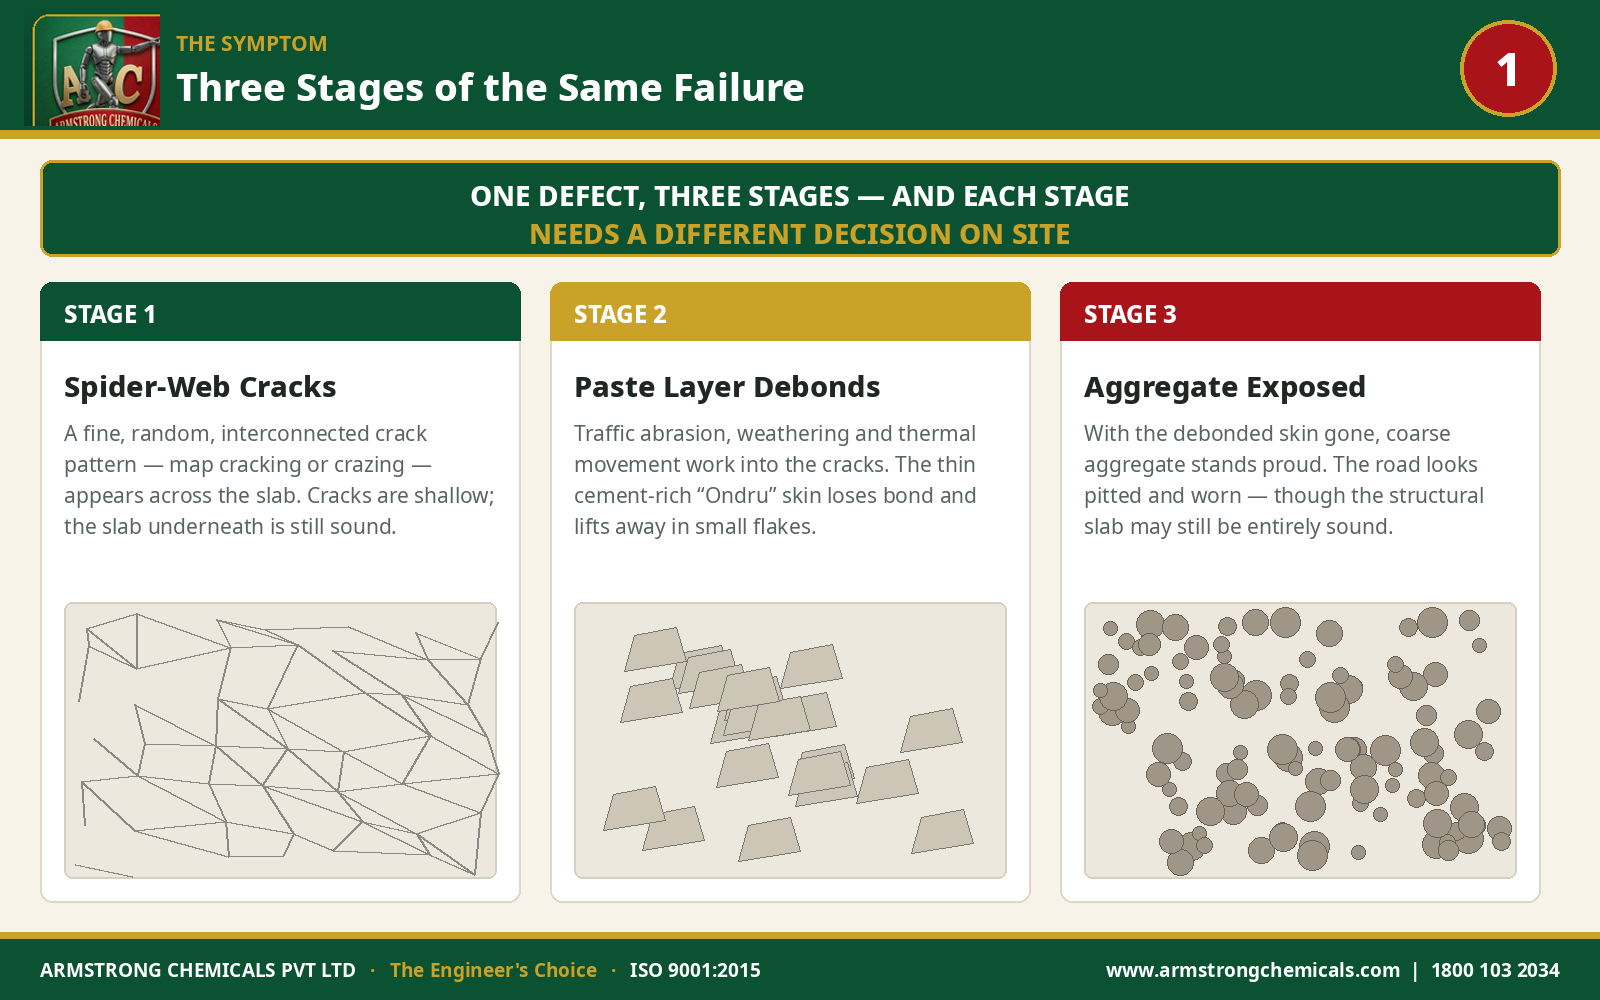
Every concrete pour develops a thin surface layer that's richer in cement and fines than the mix as a whole — trowelling and finishing naturally draw the cement paste (“Ondru”) upward while the coarser aggregate settles. Where finishers lay this layer on too thick — usually to mask minor undulations and get a smoother, more presentable surface faster — the road ends up with a skin that behaves nothing like the concrete underneath it:
- It's weaker and shrinks more. A cement-paste-rich layer has a much higher water-to-solids ratio locally than the bulk concrete, so it shrinks disproportionately as it dries — and that shrinkage is exactly what produces the random web crack pattern.
- It's a separate layer, not an integral surface. Because it's compositionally different from the concrete below, it never really becomes one continuous material with the slab. It's already primed to debond; the only question is what triggers it.
- Traffic and weather do the rest. Once shrinkage has opened the spider-web pattern, vehicle abrasion, monsoon wetting-drying cycles, and thermal movement work into those cracks from above. The debonding that follows is mechanical failure of an already-weak interface, not a new defect.
- Aggregate exposure is the end state, not a separate problem. Once the weak skin is gone, what's left is simply the coarse aggregate that was always going to be there once the paste stopped covering it.
None of this reflects badly on the base concrete — M25, M30 or whatever grade was specified may be entirely sound underneath. The defect is isolated to a layer typically less than a couple of millimetres thick. That's also why it's so commonly treatable without breaking up and re-laying the road.
Reading the Damage Before Treating It: The 10mm Decision Point
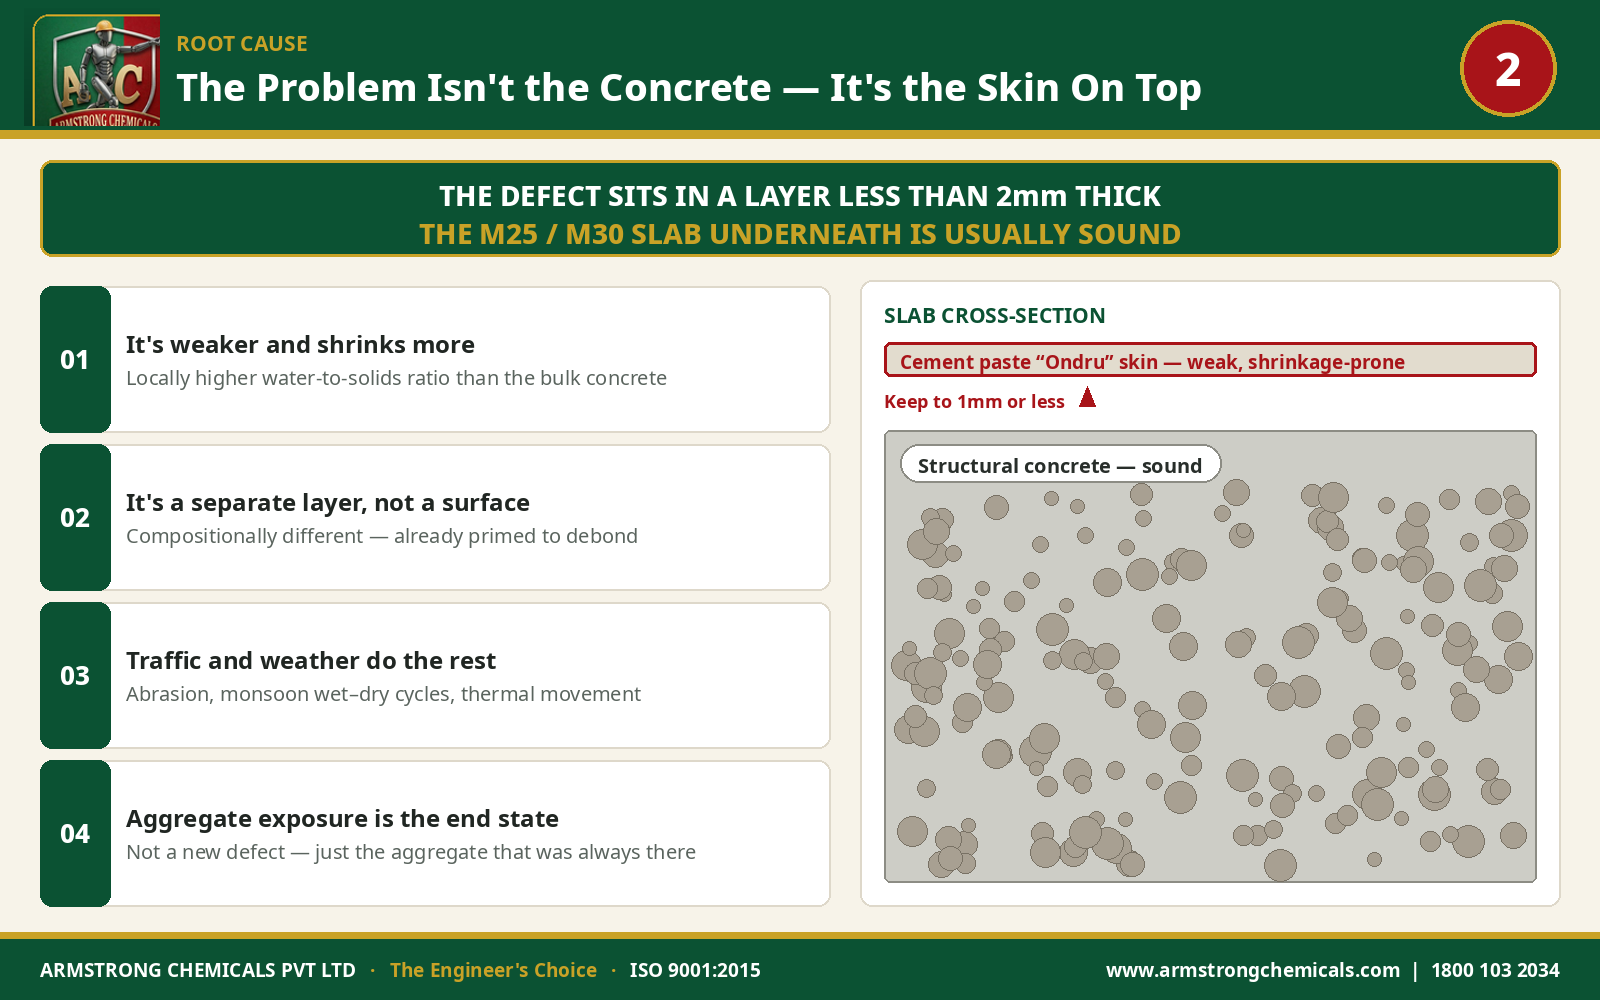
The single most important diagnostic step is measuring how deep the disturbance actually goes. Armstrong's field protocol splits treatment into two distinct systems based on this one number:
| Surface disturbance | Classification | Treatment approach |
|---|---|---|
| Less than 10mm | Surface cracking / early aggregate exposure | Surface-grade coating system — no excavation |
| More than 10mm | Structural surface loss | Localised patch repair or full re-surfacing |
Treating a >10mm defect as if it were a surface problem is the most common site mistake — a thin coating applied over an already-deep, structurally unsound patch will simply fail again, faster than the first time. Equally, breaking out and patching a road that only has shallow spider-web cracking is unnecessary cost and disruption. Getting this classification right, before any product goes down, is what makes the rest of the repair last.
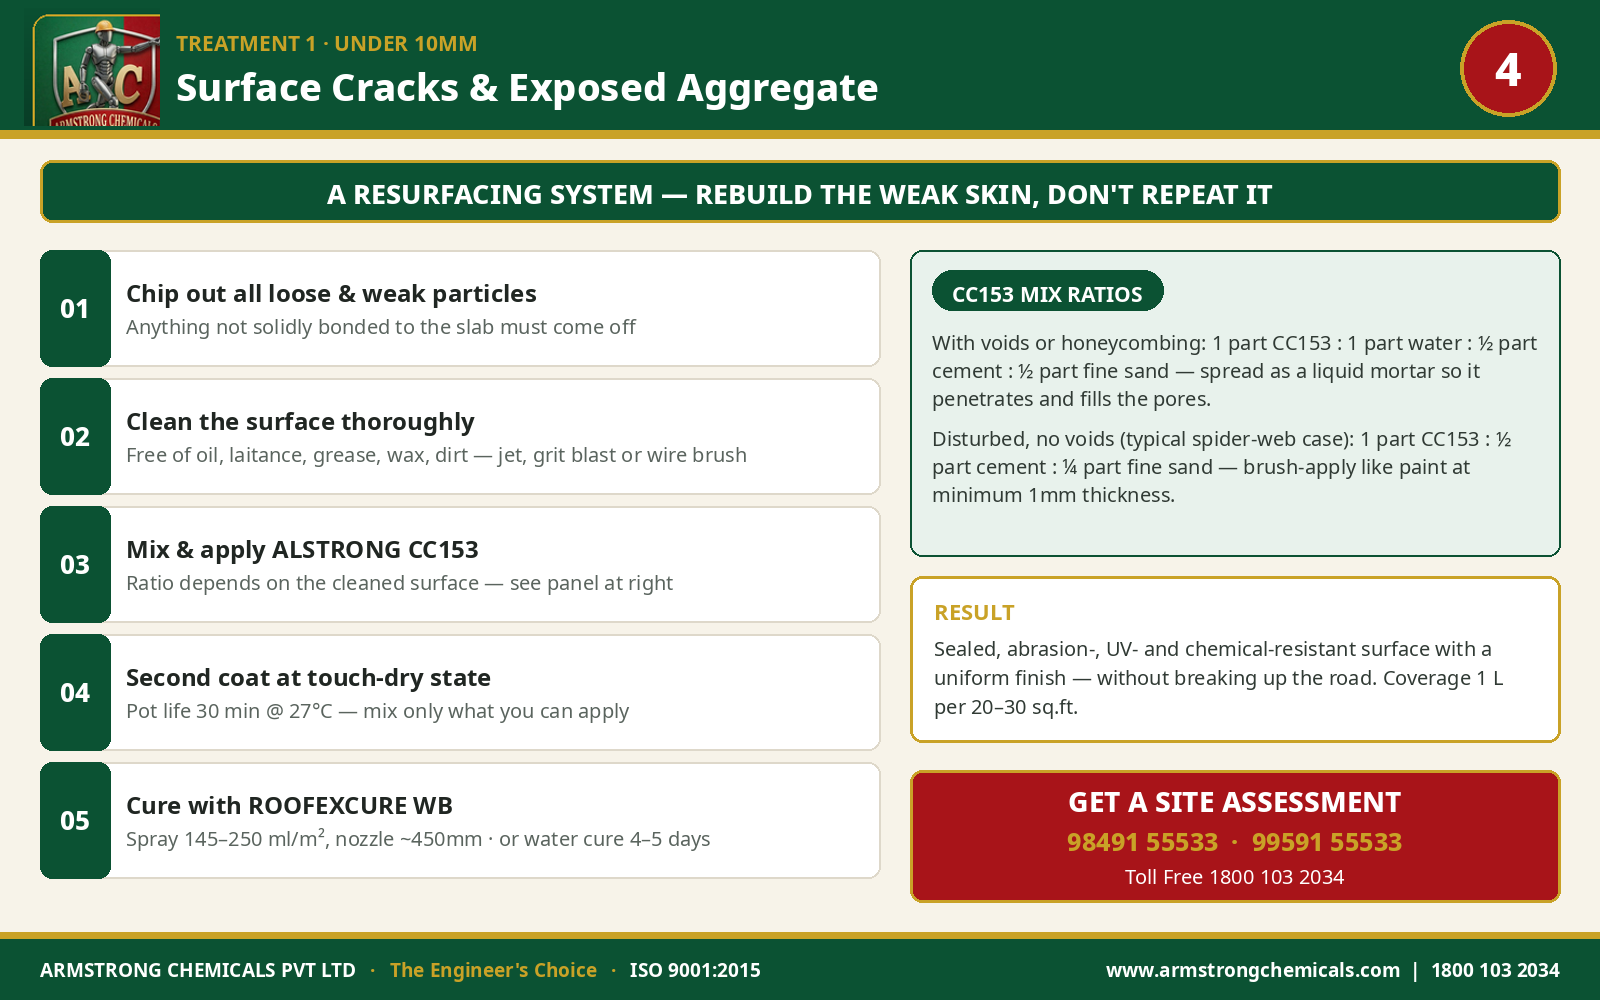
Treatment 1 — Surface Cracks & Exposed Aggregate (Disturbance Under 10mm)
This is a resurfacing system, not a structural repair — it rebuilds the weak skin with a purpose-built, abrasion-resistant coating rather than a repeat of the same cement-paste layer that failed the first time.
Step 1 — Chip out all loose and weak particles completely. Any material that isn't solidly bonded to the slab has to come off; coating over loose material only delays the same failure.
Step 2 — Clean the surface thoroughly. ALSTRONG CC153's own TDS is specific here: the surface must be free of oil, laitance, grease, wax, dirt or any foreign matter that could affect adhesion — cleaned by high-pressure water jet, grit blasting, or thorough wire brushing.
Step 3 — Mix and apply ALSTRONG CC153 — and the mix ratio depends on what the cleaned surface looks like:
- If the surface has voids or honeycombing: mix 1 part ALSTRONG CC153 with 1 part water, then add ½ part cement and ½ part fine sand. Spread this liquid mortar over the surface so it penetrates fully into the pores and voids and fills them completely.
- If the surface is disturbed but has no voids or honeycombing (the typical spider-web-crack case): mix 1 part ALSTRONG CC153 with ½ part cement and ¼ part fine sand, and brush-apply like a paint, to a minimum thickness of 1mm, for a smooth finish.
Step 4 — Apply the second coat as soon as the first reaches touch-dry state — do not wait longer, and do not rush it either; ALSTRONG CC153 has a pot life of 30 minutes at 27°C, so mix only what can be applied within that window.
Step 5 — Cure the finished surface. Apply ROOFEXCURE WB curing compound by spray (145–250 ml/m², nozzle held ~450mm from the surface), or adopt sustained water curing, for 4–5 days. This step is not optional: a coating that isn't given time to hydrate and gain strength properly will crack again for the same reasons the original surface did.
Result: a sealed, abrasion-resistant, UV- and chemical-resistant surface with improved durability and a uniform finish — without breaking up the road. Coverage works out to roughly 1 litre of ALSTRONG CC153 per 20–30 sq.ft, depending on the depth of pores and voids being penetrated.
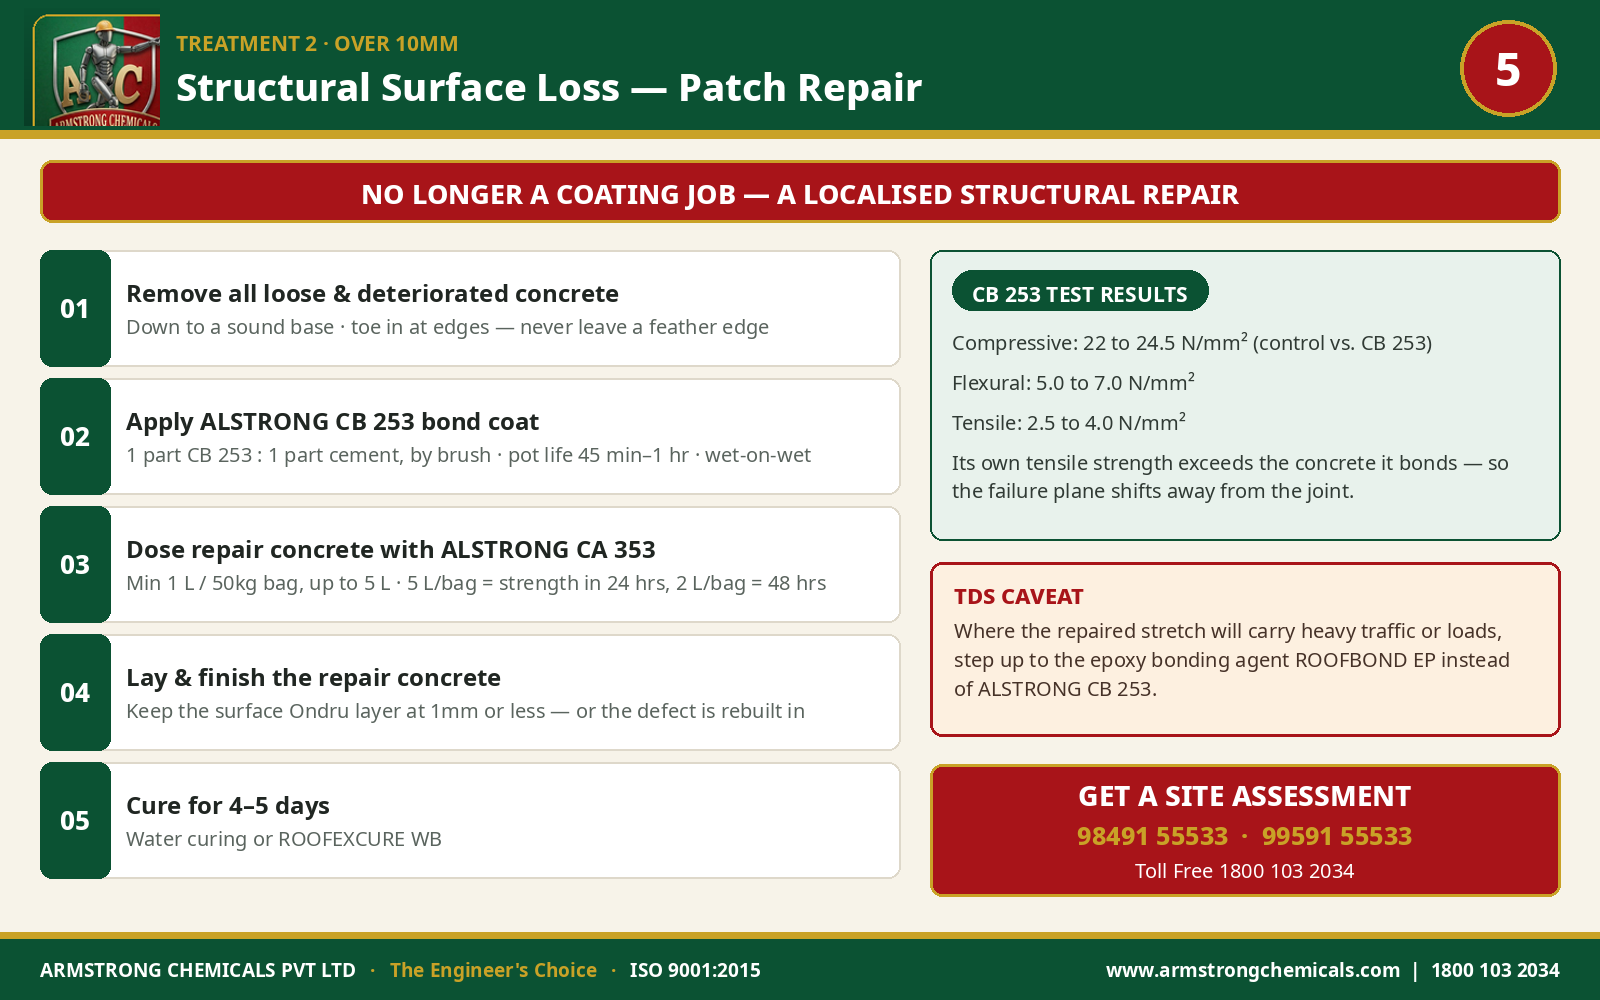
Treatment 2 — Structural Surface Loss (Disturbance Over 10mm)
Once the damage goes deeper than 10mm, this is no longer a coating job — it's a localised patch repair or resurfacing, treated with the same rigour as any structural concrete repair.
Step 1 — Remove all loose and deteriorated concrete down to a sound base, and prepare the surface thoroughly — toeing in at the edges wherever possible avoids leaving a feather edge that fails first.
Step 2 — Apply ALSTRONG CB 253 as a bonding agent. Mix 1 part ALSTRONG CB 253 with 1 part cement and apply by brush over the old concrete, including the edges. The bond coat has a pot life of 45 minutes to 1 hour — every surface must be applied wet-on-wet; the bond coat must never be allowed to dry before the fresh concrete goes on. In independent testing, ALSTRONG CB 253 raised compressive strength from a 22 N/mm² control to 24.5 N/mm², flexural strength from 5.0 to 7.0 N/mm², and tensile strength from 2.5 to 4.0 N/mm² — and its own tensile strength exceeds that of the concrete it's bonding, which is why the failure plane shifts away from the joint. One caveat direct from the TDS: where the repaired stretch will carry heavy traffic or loads, Armstrong's own recommendation is to step up to the epoxy bonding agent ROOFBOND EP instead of ALSTRONG CB 253.
Step 3 — Prepare the repair concrete with ALSTRONG CA 353 as an admixture, added to the mix at a minimum of 1 litre per 50kg bag of cement, and adjustable up to 5 litres per bag depending on how fast the strength is needed: 5 litres/bag targets early compressive strength within 24 hours, while 2 litres/bag reaches high compressive strength over 48 hours. ALSTRONG CA 353 is a polymer-based, acrylic-blended plasticiser complying with BS 5075 Part III and ASTM-C494 Type G, delivering 11.5 N/mm²/day of early strength gain and 40 N/mm² compressive strength at 28 days, while also reducing segregation, bleeding and shrinkage in the hardened mortar/concrete — chloride-free, so it doesn't work against the corrosion protection the mix is otherwise built for.
Step 4 — Lay the repair concrete and finish it properly. This is the step where the original defect gets built back in if it isn't respected: avoid laying the surface cement paste (Ondru) any thicker than 1mm on the finished surface. A thick trowelled skin here recreates exactly the weak layer this whole repair exists to fix.
Step 5 — Cure properly, using either water curing or ROOFEXCURE WB, for 4–5 days.
Result: long-lasting, strong and durable repairs that don't just look fixed at handover, but hold up under the traffic loading that broke the original surface — because the bond, the admixture and the surface skin were each addressed by the product actually engineered for that step.
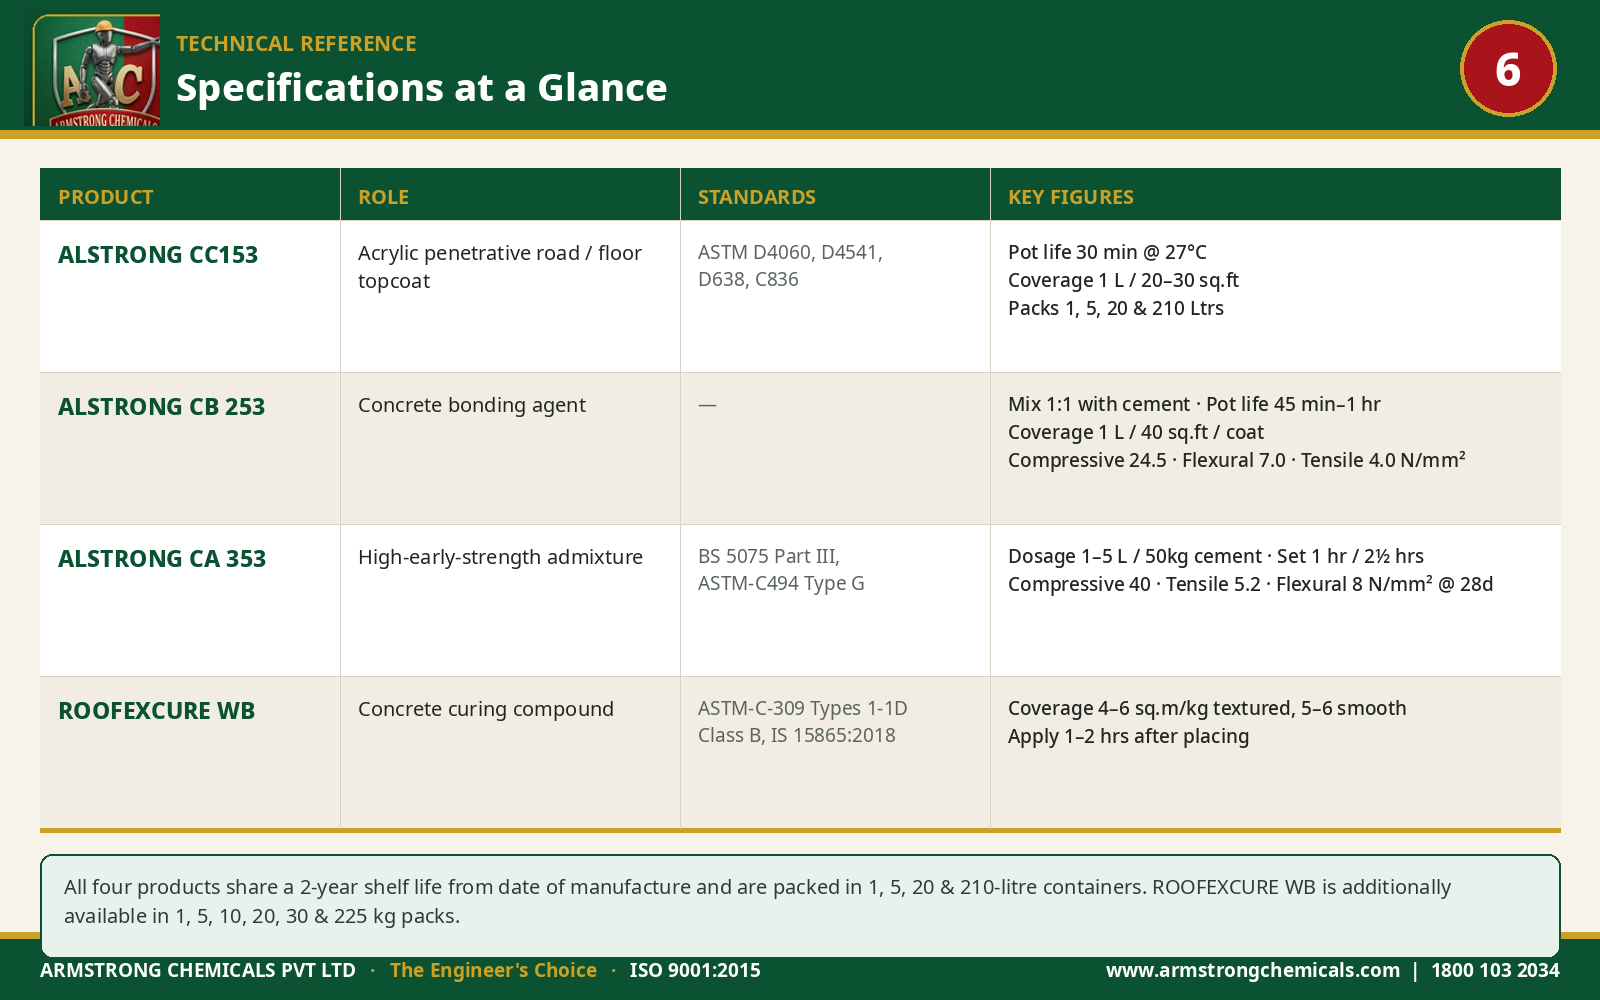
Technical Reference: Specifications at a Glance
| Product | Role | Standards | Key figures |
|---|---|---|---|
| ALSTRONG CC153 | Acrylic penetrative road/floor topcoat | ASTM D4060, D4541, D638, C836 | Pot life 30 min @27°C · Coverage 1L/20–30 sq.ft · Pack 1, 5, 20 & 210 Ltrs |
| ALSTRONG CB 253 | Concrete bonding agent | — | Mix 1:1 with cement · Pot life 45 min–1 hr · Coverage 1L/40 sq.ft/coat · Compressive 24.5 N/mm², Flexural 7.0 N/mm², Tensile 4.0 N/mm² |
| ALSTRONG CA 353 | High-early-strength admixture | BS 5075 Part III, ASTM-C494 Type G | Dosage 1–5 L/50kg cement · Setting: Initial 1 Hr, Final 2½ Hrs · Compressive 40 N/mm² @28d · Tensile 5.2 N/mm² @28d · Flexural 8 N/mm² @28d |
| ROOFEXCURE WB | Concrete curing compound | ASTM-C-309 Types 1-1D Class B, IS 15865:2018 | Coverage 4–6 sq.m/kg (textured), 5–6 sq.m/kg (smooth) · Apply 1–2 hrs after placing |
All four products share a 2-year shelf life from date of manufacture and are packed in 1, 5, 20 & 210-litre containers (ROOFEXCURE WB additionally in 1, 5, 10, 20, 30 & 225 Kg packs).
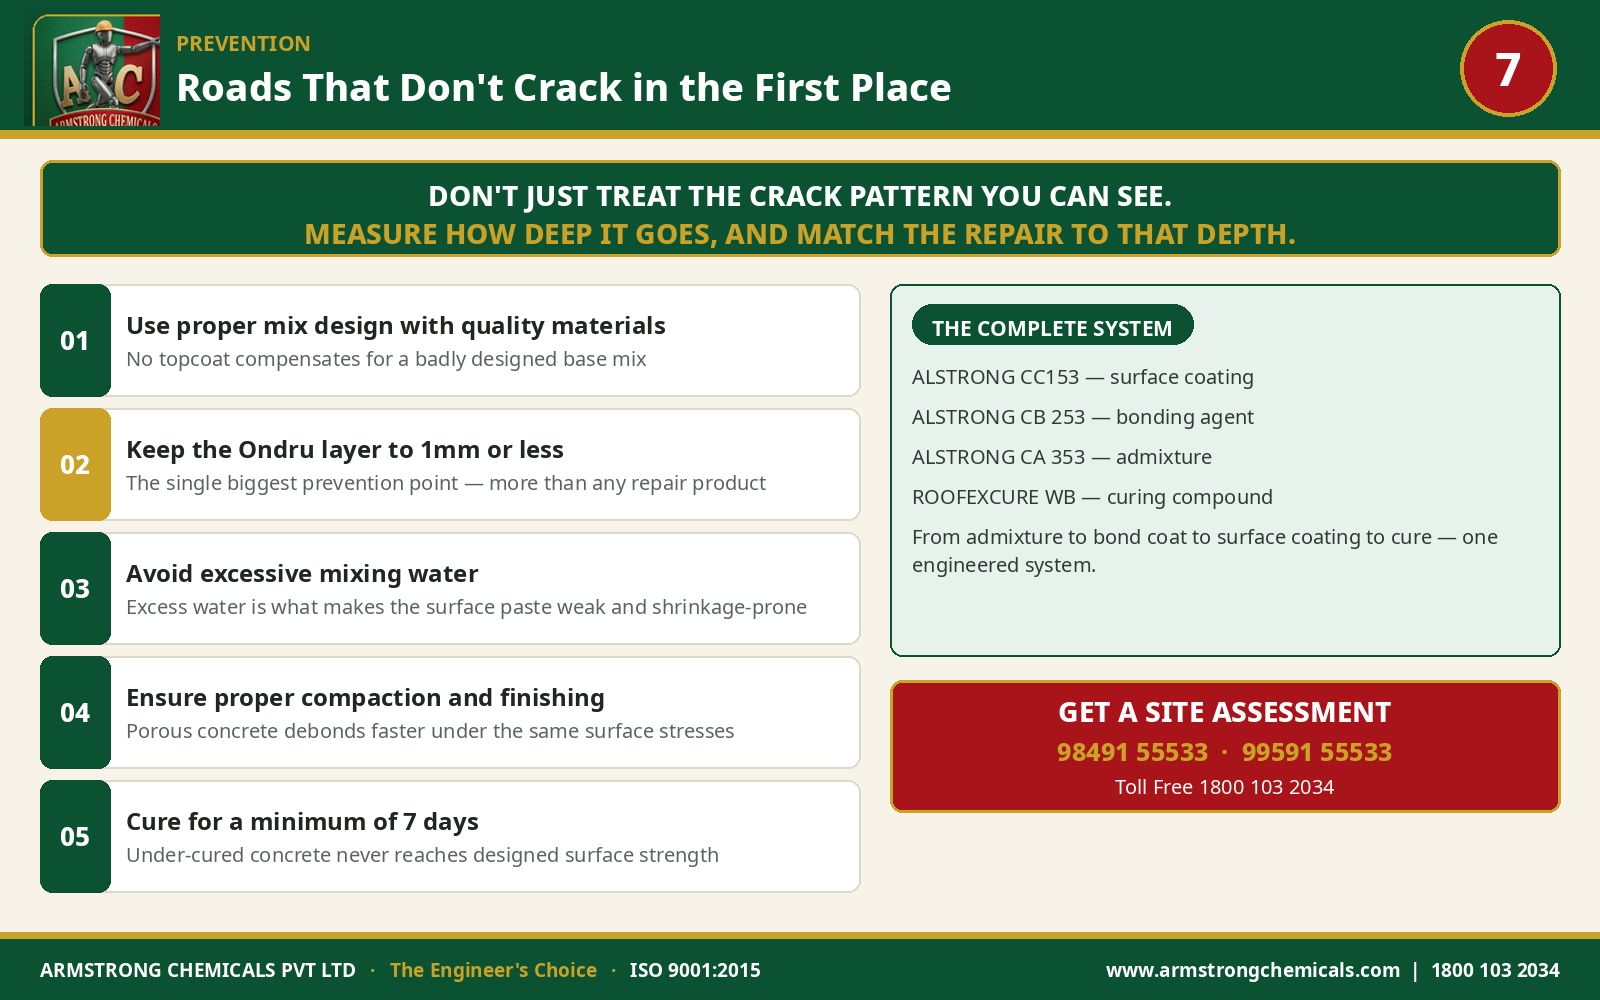
The Engineering Principle: Guidelines for Roads That Don't Crack in the First Place
Every point in Armstrong's field guidance for durable concrete roads addresses the same root cause the spider-web crack pattern comes from — a thin, weak, over-thick surface layer:
- Use proper mix design with quality materials. No topcoat compensates for a badly designed base mix.
- Keep the cement paste (Ondru) layer on the surface to a minimum — 1mm or less. This single discipline point prevents more spider-web cracking than any repair product does after the fact.
- Avoid excessive mixing water. Excess water is what makes the surface paste layer weak and shrinkage-prone to begin with.
- Ensure proper compaction and finishing. Poorly compacted concrete is porous concrete, and porous concrete debonds faster under the same surface stresses.
- Cure adequately for a minimum of 7 days. Under-cured concrete never reaches its designed strength at the surface, where abrasion resistance matters most.
- Use Armstrong's proven solutions for long-lasting performance — ALSTRONG CC153, ALSTRONG CB 253, ALSTRONG CA 353 and ROOFEXCURE WB together form a complete system, from admixture to bonding agent to surface coating to cure.
Don't just treat the crack pattern you can see. Measure how deep it actually goes, and match the repair to that depth.
A road that looks the same at Stage 1 and Stage 3 needs entirely different treatment — coating a structurally lost surface fails fast, and patching a road that only needed a surface coat wastes time and money that didn't need spending. Repair today, on the correct diagnosis, and it prevents the major damage tomorrow.
Need a site-specific system?
Armstrong's technical team can assess the depth of surface disturbance, traffic loading, and the correct repair sequence for your road or pavement.
Concrete Road Spider-Web Crack Repair FAQs
© 2026 Armstrong Chemicals Pvt Ltd. All rights reserved.