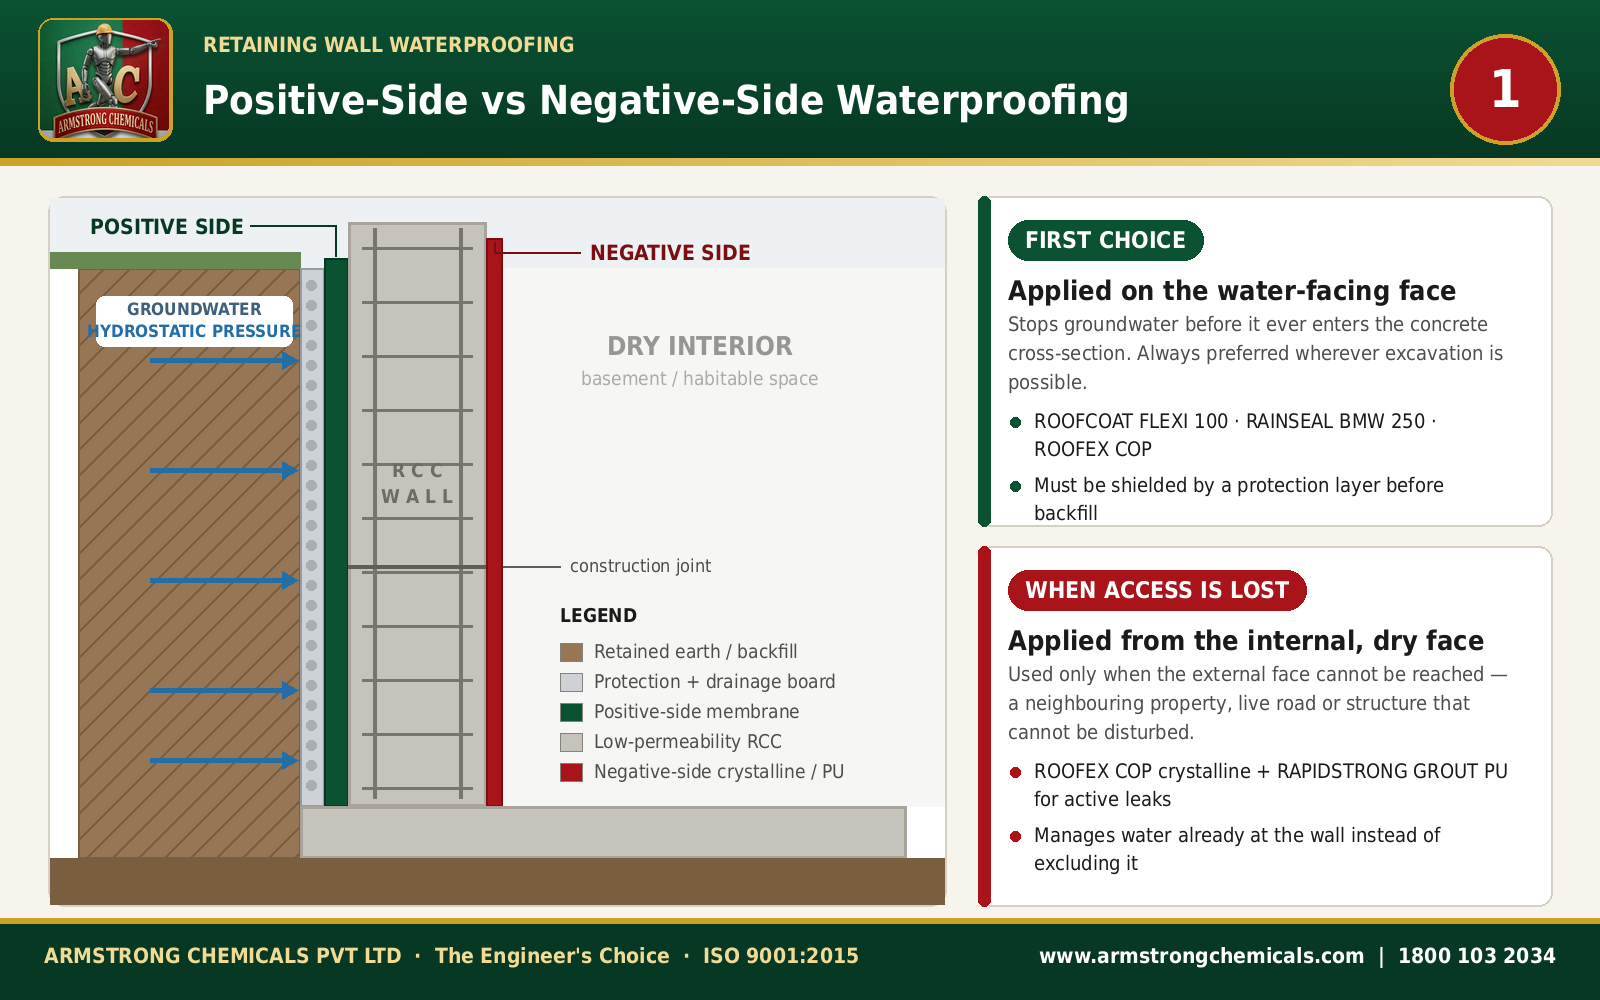
Retaining walls live a harder life than almost any other part of a structure. Placed against cut earth or below grade, they sit in constant contact with damp backfill and seasonal or permanent groundwater. Across India's monsoon states—from Kerala's coastline and Chennai to Bengaluru and Telangana's clay soils—that means sustained hydrostatic pressure pushing against the wall for months at a time.
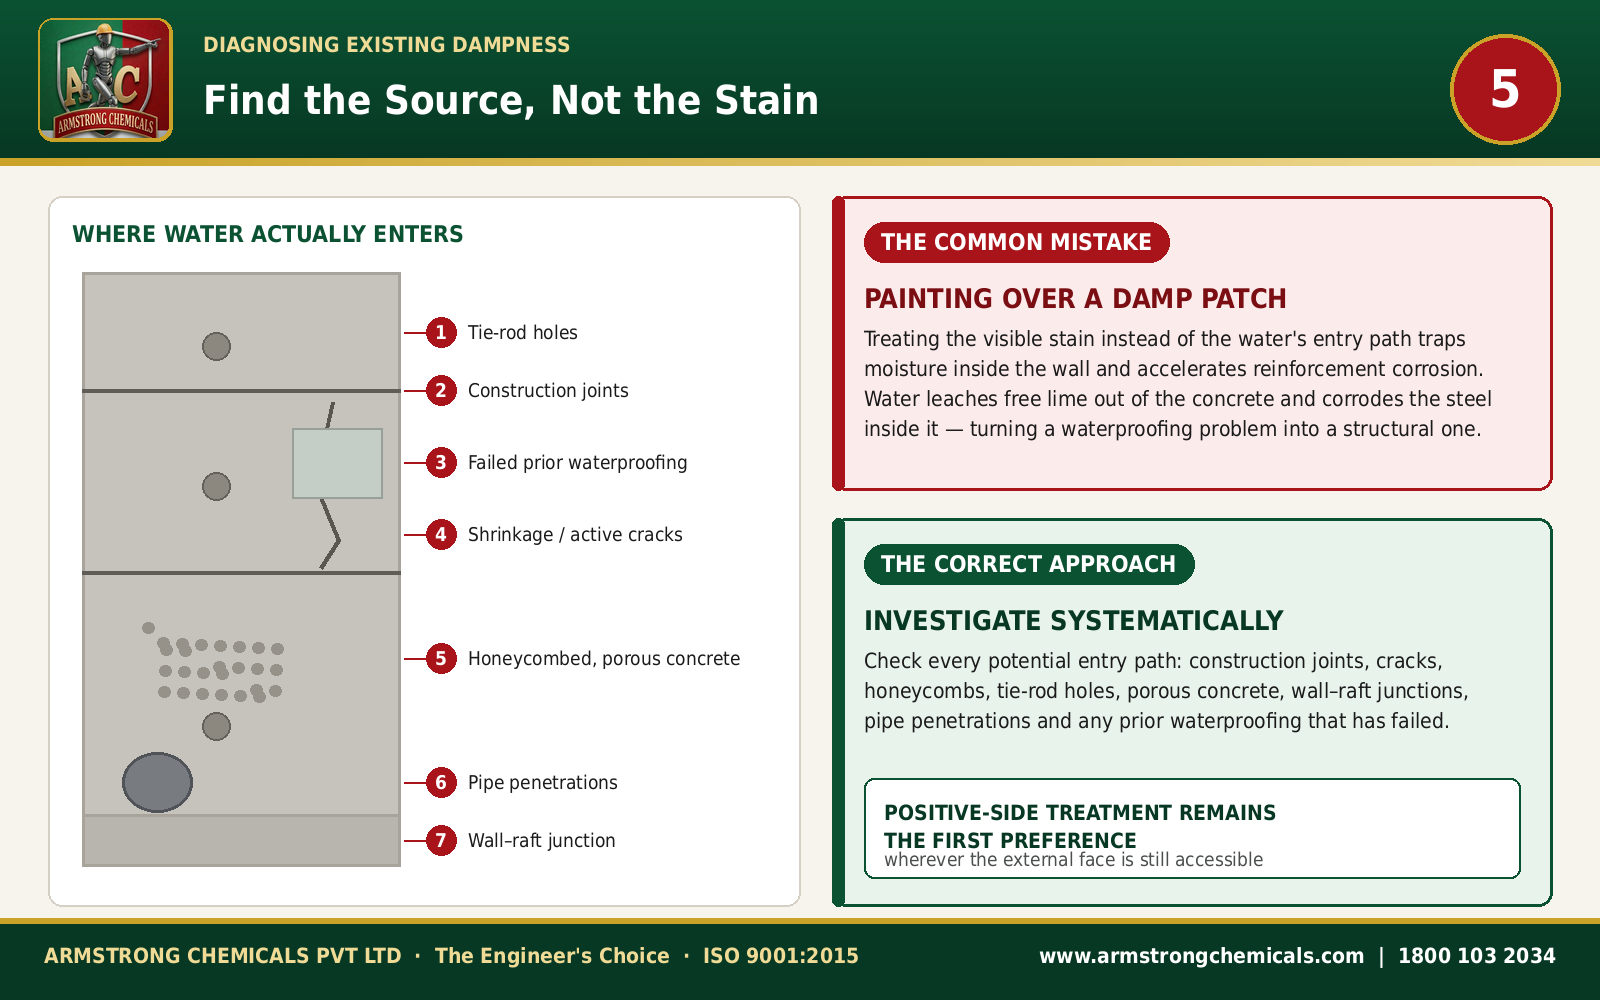
Water follows the path of least resistance: construction joints, honeycombed pockets, tie-rod holes, wall-to-raft junctions, and shrinkage micro-cracks. Left untreated, it leaches free lime and corrodes reinforcement, turning a waterproofing problem into a structural one.
Why Concrete Is the First Line of Defence
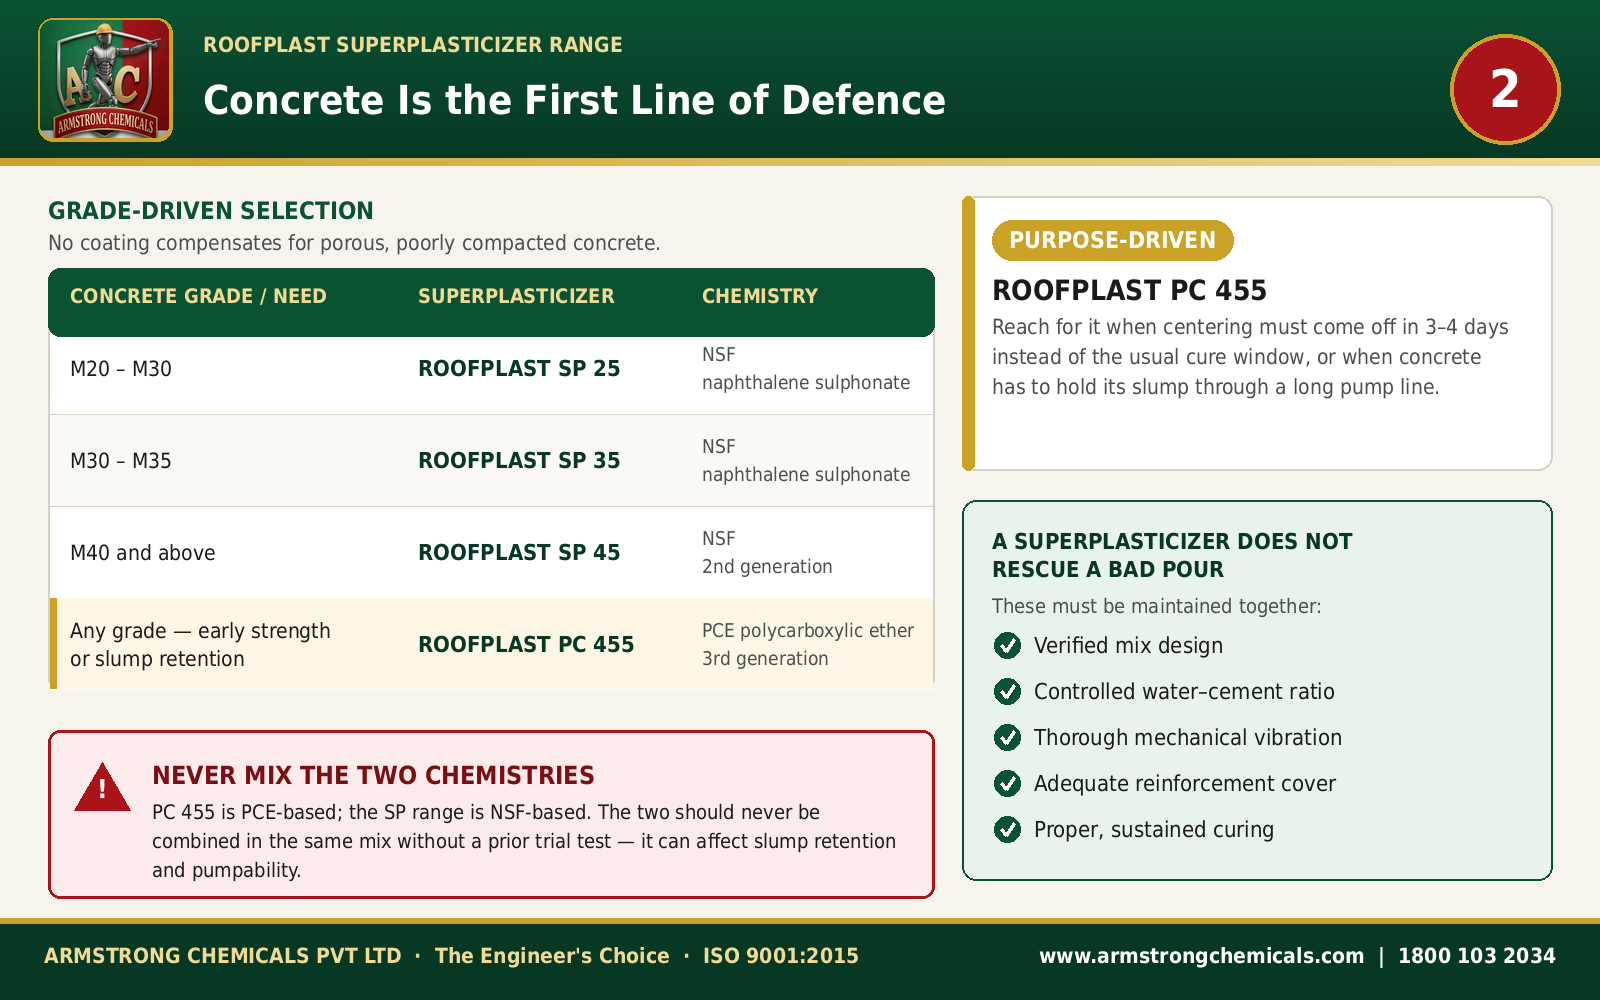
No coating compensates for porous, poorly compacted concrete. Armstrong's ROOFPLAST range helps produce dense, low-permeability concrete, with each grade selected for a specific need.
| Concrete grade / need | Superplasticizer | Chemistry |
|---|---|---|
| M20–M30 | ROOFPLAST SP 25 | NSF |
| M30–M35 | ROOFPLAST SP 35 | NSF |
| M40 and above | ROOFPLAST SP 45 | NSF, 2nd generation |
| Early strength or slump retention | ROOFPLAST PC 455 | PCE, 3rd generation |
Never combine the PCE-based PC 455 and NSF-based SP range in the same mix without a prior trial test.
A verified mix design, controlled water-cement ratio, thorough vibration, adequate cover, and proper curing must work together. A superplasticizer cannot rescue a badly placed or cured pour.
Construction Joints: Where Most Leaks Actually Start
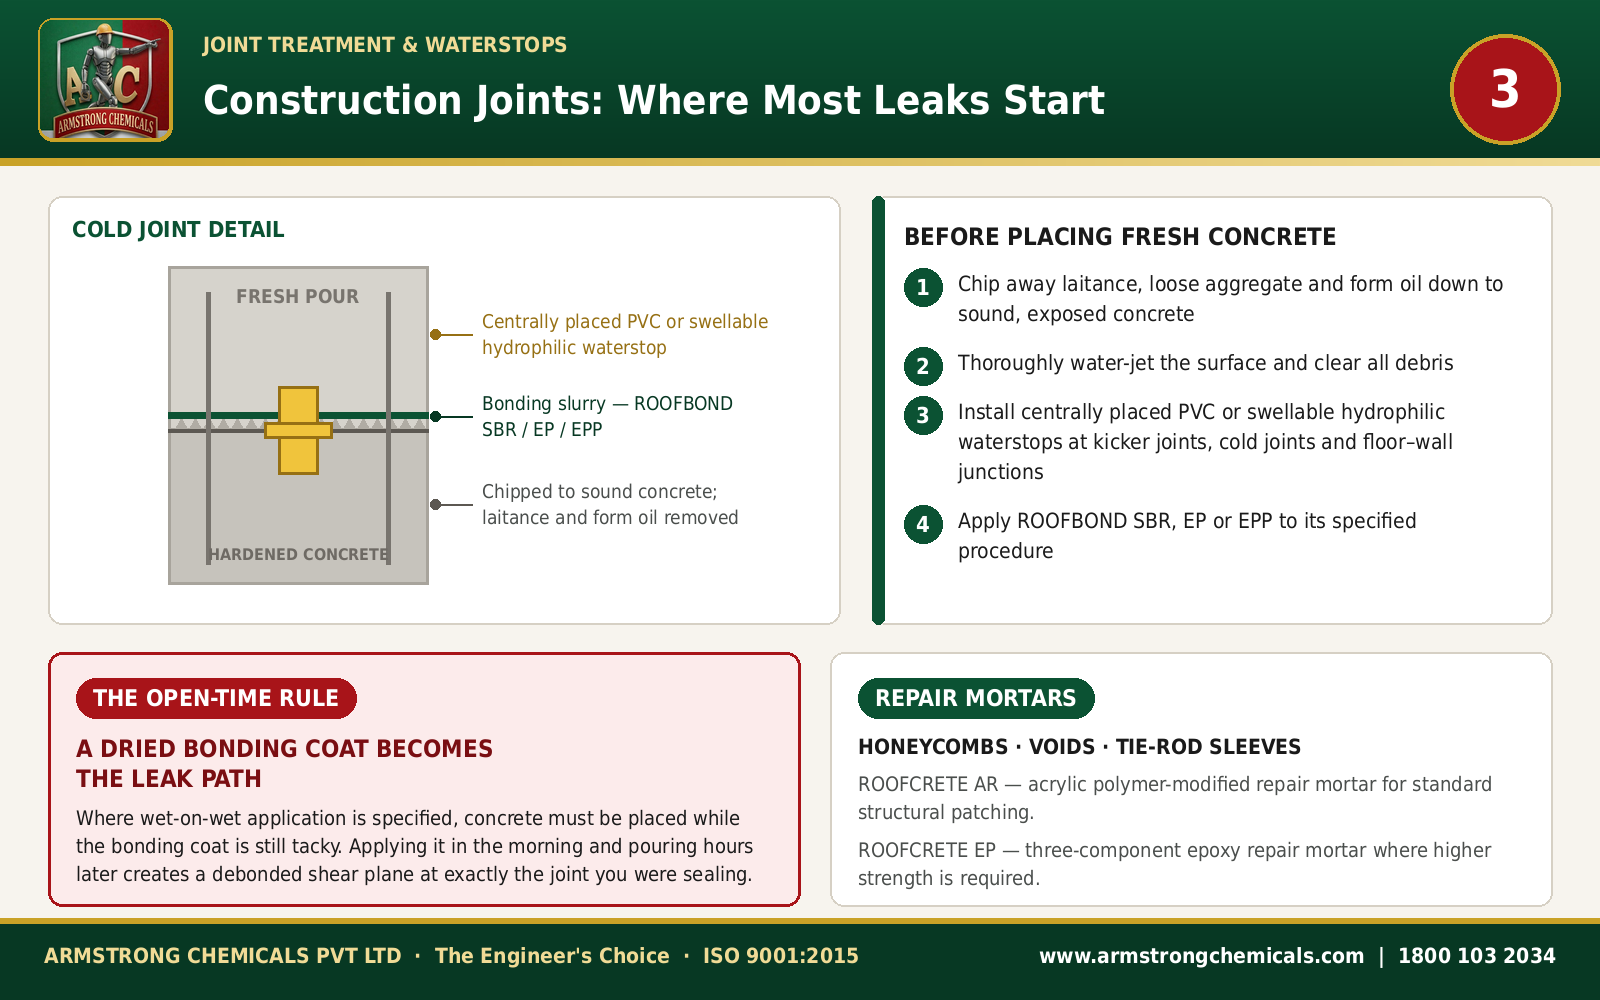
Before placing fresh concrete against hardened concrete, remove laitance and contaminants, water-jet the surface, install centrally placed PVC or hydrophilic waterstops where specified, and apply ROOFBOND SBR 401, ROOFBOND EP, or ROOFBOND EPP 504 according to its procedure.
The open-time rule matters. Where wet-on-wet application is specified, fresh concrete must be placed while the bonding coat is still tacky. A dried bonding coat can create the very leak path it was meant to prevent.
Honeycombs, voids, and tie-rod sleeves are repaired with ROOFCRETE AR, or ROOFCRETE EP where higher strength is required.
Positive-Side Waterproofing: The Primary Barrier
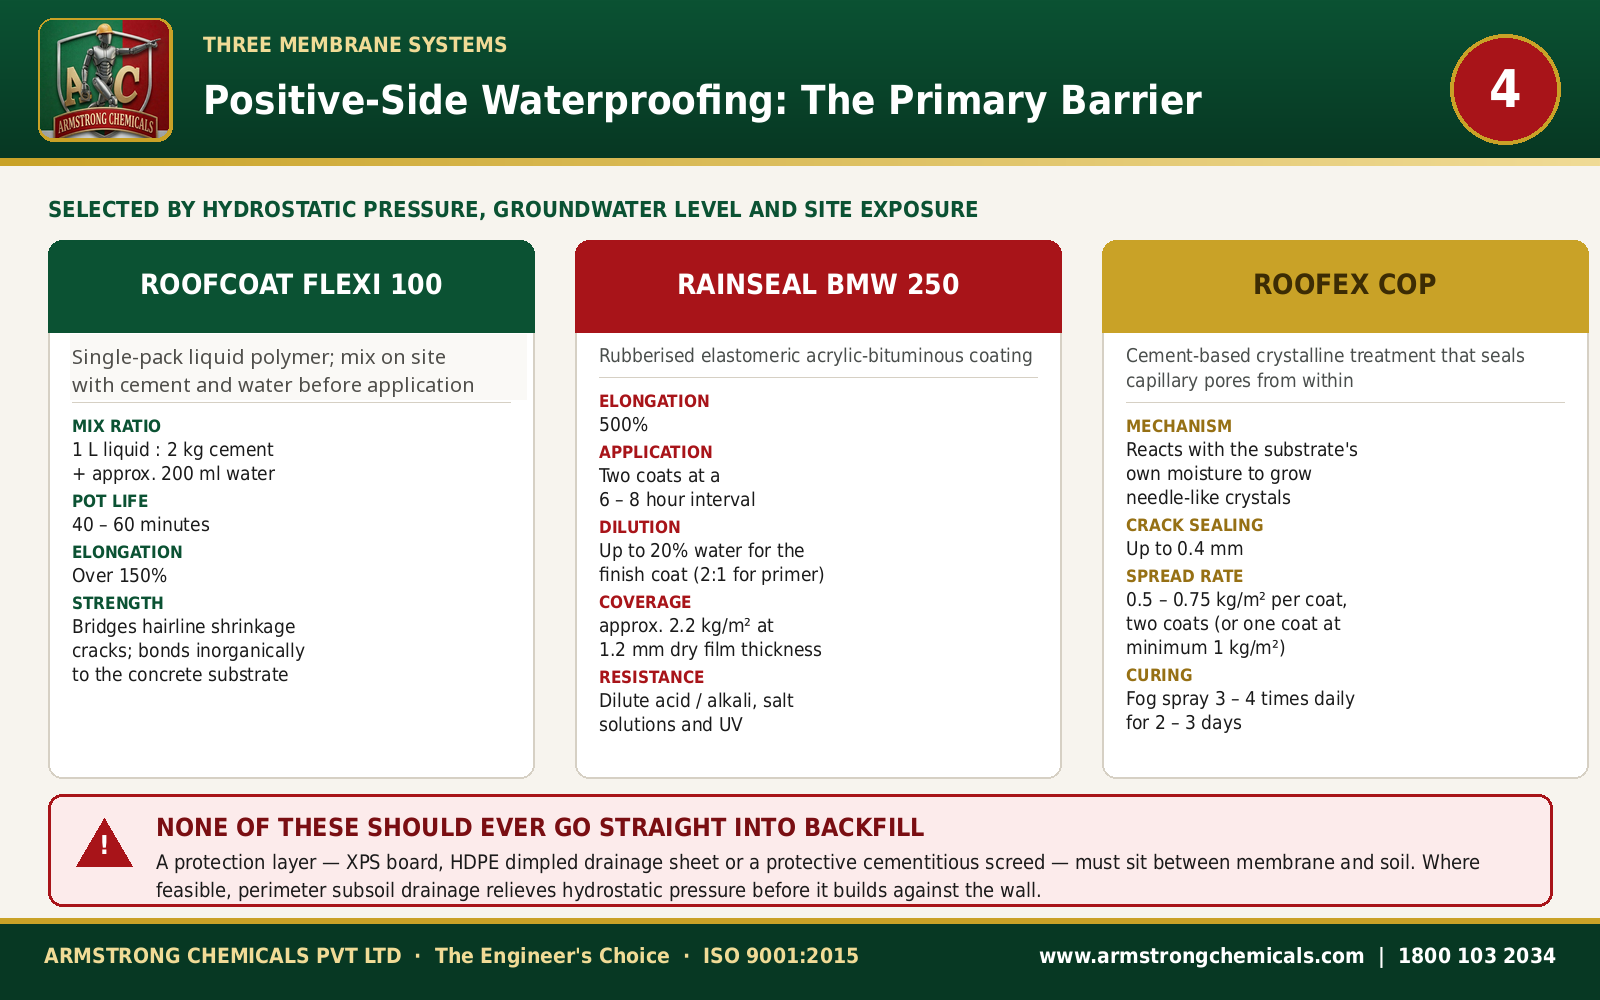
The external face is inspected and repaired before the waterproofing system is chosen for hydrostatic pressure, groundwater level, and site exposure.
- ROOFCOAT FLEXI 100 — a single-pack liquid polymer supplied ready for site mixing with cement and water before application. Mix 1 litre of liquid with 2 kg cement and approximately 200 ml water; pot life is 40–60 minutes.
- RAINSEAL BMW 250 — a rubberised acrylic-bituminous coating with 500% elongation, applied in two coats at a 6–8 hour interval.
- ROOFEX COP — a cement-based crystalline treatment that reacts with substrate moisture to seal capillary pores from within.
Every membrane needs a protection layer before backfilling. XPS board, an HDPE dimpled sheet, or a protective cementitious screed prevents puncture during compaction.
When Dampness Has Already Developed: Find the Source, Not the Stain
Painting over a visible damp patch traps moisture and accelerates reinforcement corrosion. Investigate construction joints, cracks, honeycombs, tie-rod holes, porous concrete, wall-raft junctions, pipe penetrations, and failed earlier waterproofing.
Positive-side treatment remains the first preference wherever the external face is accessible because it intercepts groundwater before it enters the concrete.
When External Access Is Impossible: Negative-Side Waterproofing
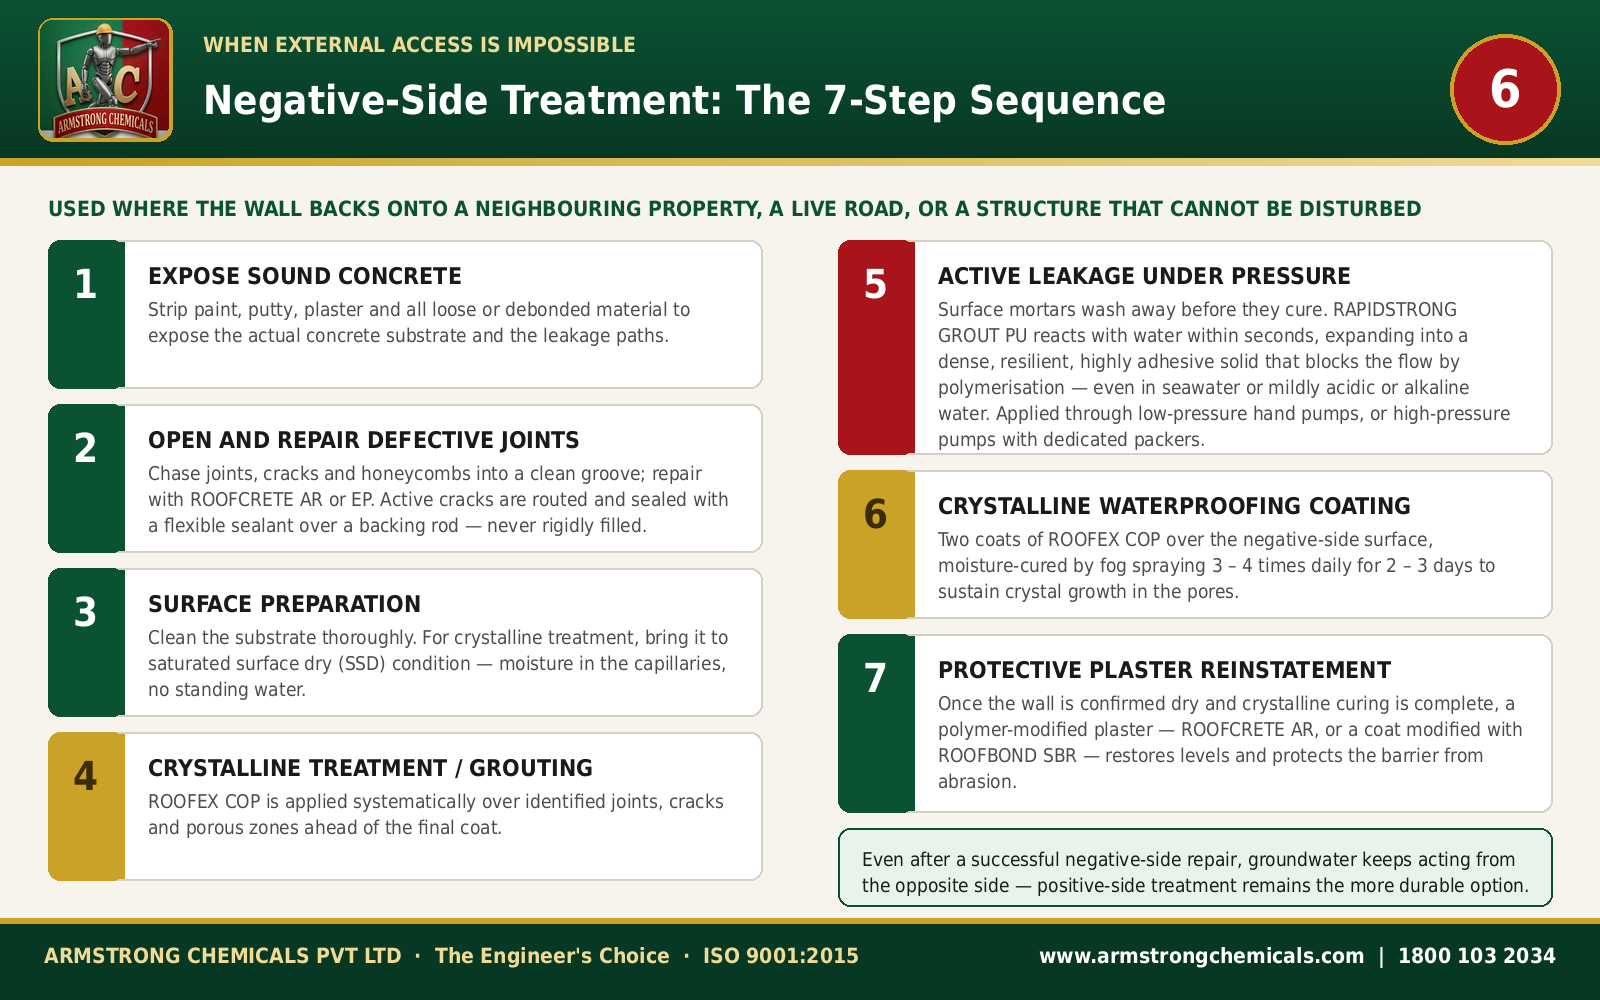
- 1. Expose sound concrete. Strip paint, putty, plaster, and all loose material.
- 2. Repair defective joints. Chase cracks and honeycombs into a clean groove; use flexible joint sealant for active movement.
- 3. Prepare the surface. Clean thoroughly and bring crystalline-treatment areas to saturated surface dry condition.
- 4. Treat identified paths. Apply ROOFEX COP systematically over joints, cracks, and porous zones.
- 5. Stop active flow. RAPIDSTRONG GROUT PU is a single-component, water-reactive injection grout that expands into a dense, resilient solid.
- 6. Apply the crystalline coating. Apply two coats and moisture-cure with fog spraying 3–4 times daily for 2–3 days.
- 7. Reinstate protective plaster. Restore levels after the wall is dry and curing is complete.
The Engineering Principle Behind All of This
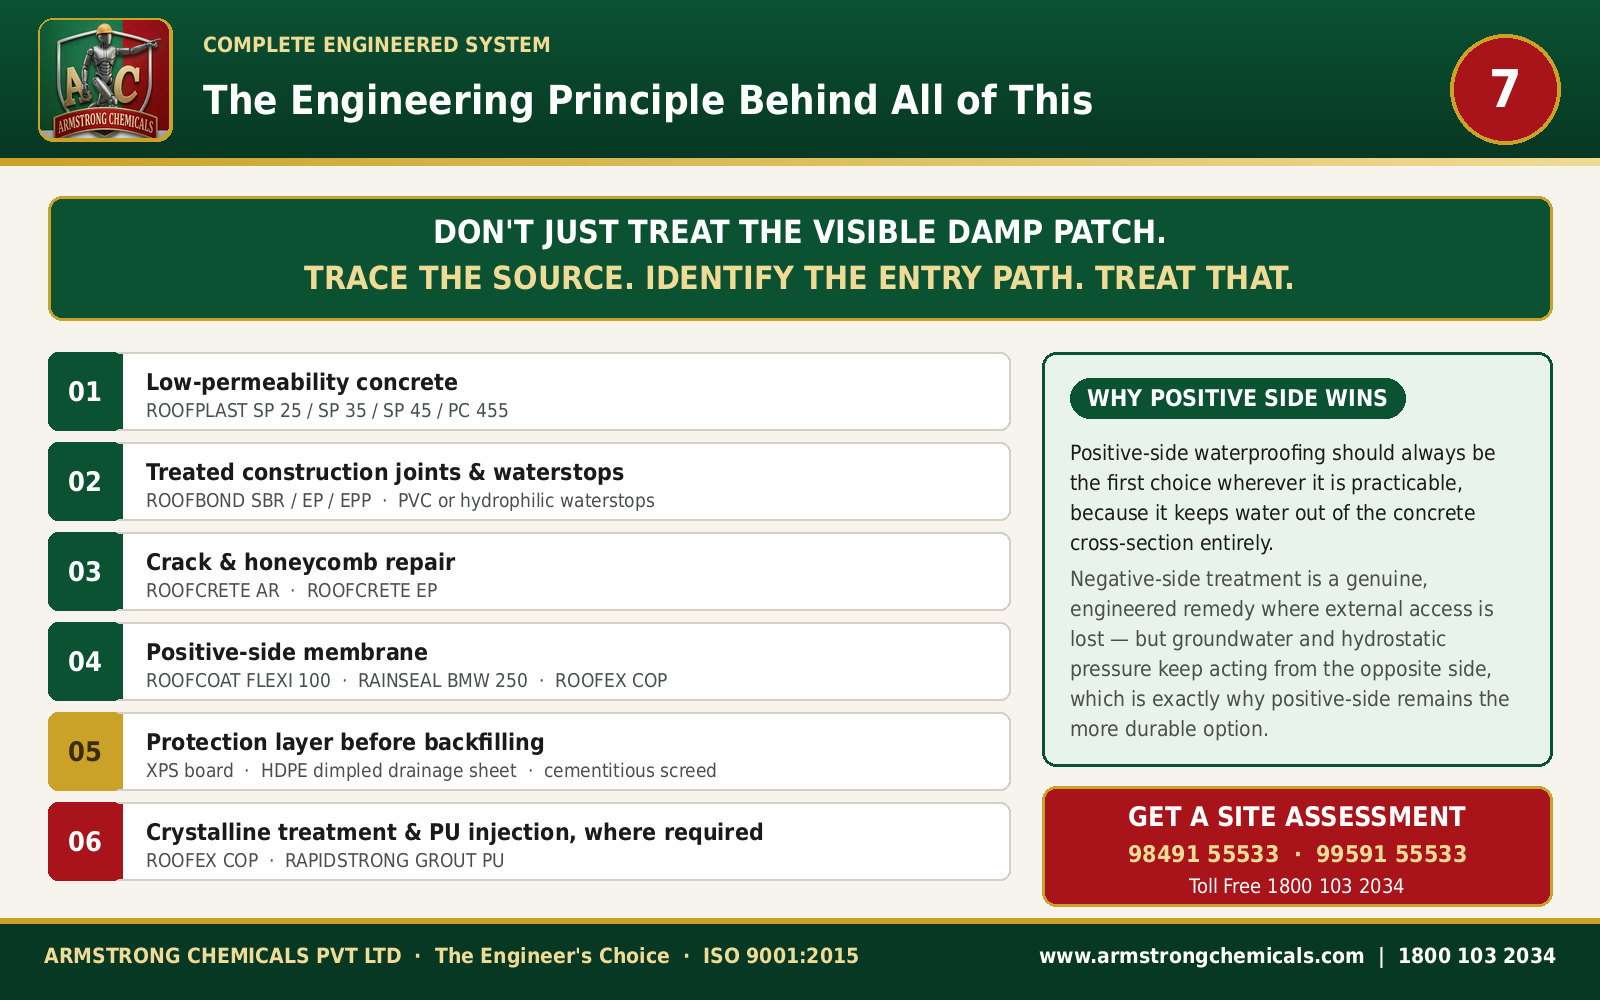
Don't just treat the visible damp patch. Trace the source. Identify the entry path. Treat that.
Successful retaining-wall waterproofing is a complete engineered system: low-permeability concrete, treated joints and waterstops, defect repair, a positive-side membrane, protection before backfilling, and—where required—crystalline treatment and PU injection grouting.
Need a site-specific system?
Armstrong's technical team can assess the water-entry path, access conditions, hydrostatic pressure, and required repair sequence.
Retaining Wall Waterproofing FAQs
© 2026 Armstrong Chemicals Pvt Ltd. All rights reserved.