Not every crack in a building needs the same fix, and treating them as if they do is why so many crack repairs fail within a year or two — or worse, why an injection grout gets pumped into a plaster crack that never needed it, or a structural crack in a column gets skim-coated over instead of engineered. "Concrete crack" covers four very different surfaces: a terrace or RCC slab, an interior or exterior wall, and a beam or column. Each has its own repair logic, and the single biggest branch point is whether the crack even calls for injection grouting at all — it does for most terrace, slab and structural-member cracks, and it usually does not for the plaster and masonry cracking that makes up most of what shows up on walls. Get that branch wrong at the start and no amount of skill in the application saves the repair. This guide classifies the crack first, then routes it to the right treatment by element, the way Armstrong's engineers do on site.
Step 1 — Inspect and Classify: Structural or Non-Structural, Active or Dormant
Every crack repair decision starts with two questions, answered in this order, before any product is chosen.
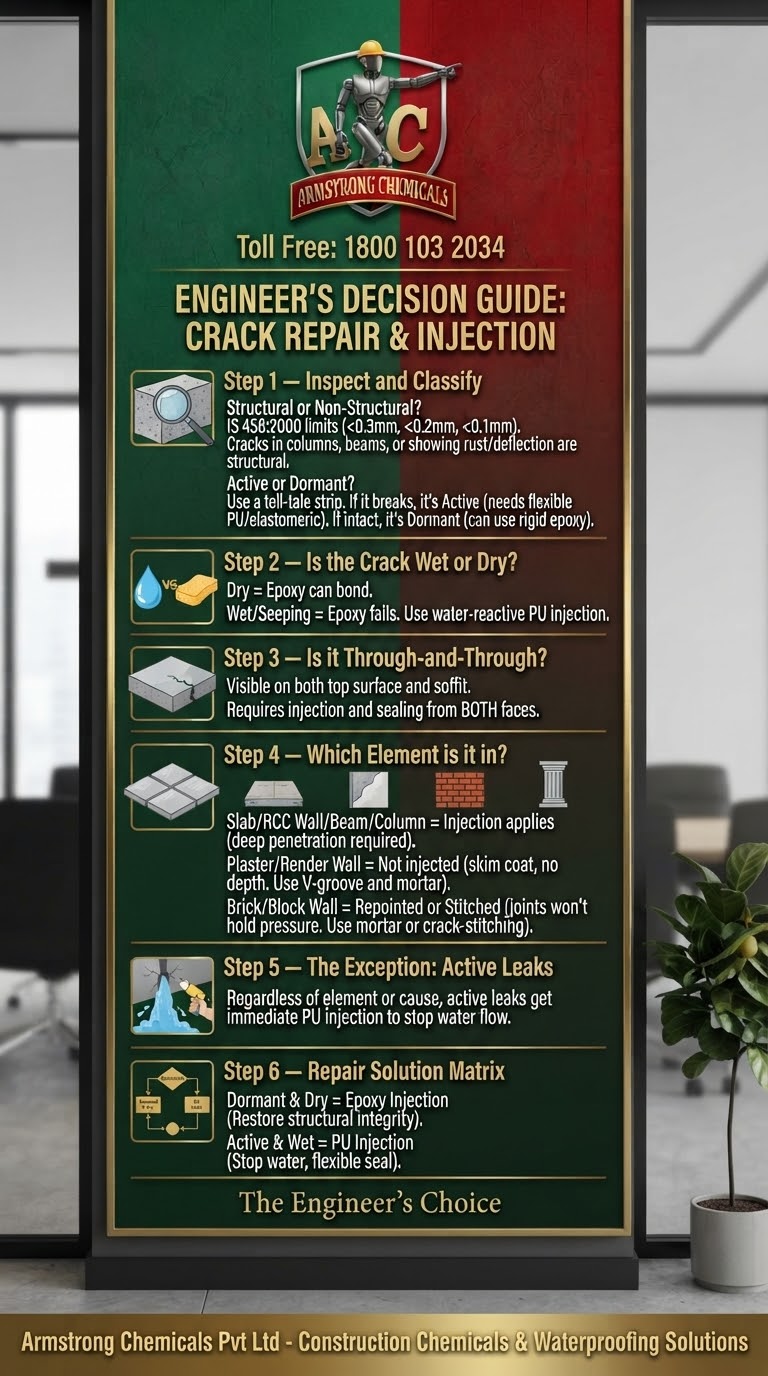
Is the crack structural or non-structural? IS 456:2000, Clause 35.3.2 sets the surface crack-width limits reinforced concrete is designed around: up to 0.3mm in members where cracking is not harmful and has no serious adverse effect on the reinforcement or durability of the structure; 0.2mm where the member is in a tensile zone exposed to moisture or in contact with soil or groundwater; and as tight as 0.1mm under severe exposure conditions. A crack that stays inside the limit for its exposure category is generally shrinkage- or temperature-related and non-structural — cosmetic and durability work, not an engineering emergency. A crack wider than that limit, especially in a column, beam or load-bearing slab, is a structural question first and a repair-chemistry question second: get an engineer's assessment before any product goes down. Diagonal cracks in beams and columns, cracks accompanied by visible deflection, and cracks showing rust staining from corroding reinforcement all belong in this category.
Is the crack active or dormant? A crack's behaviour over time matters as much as its width. Fix a tell-tale strip — a thin strip of mortar, glass, or a dated witness mark — across the crack and check it after roughly 30 days. If the tell-tale stays intact, the crack has stabilised and is dormant. If it cracks too, the structure is still moving and the crack is active. This distinction decides the chemistry: a dormant crack can be rigidly glued back together with epoxy, restoring structural continuity. An active crack cannot — inject a rigid epoxy into a crack that is still moving and a new crack simply opens beside the repair. Active cracks need a flexible system instead: PU injection grout, or a crack-bridging elastomeric coating.
A third factor decides the method regardless of the first two: is the crack wet or dry? Epoxy will not bond to a wet or actively seeping surface — it needs a dry substrate to cure. A crack with active water ingress rules epoxy out immediately, whatever its width or structural status, and moves the job to a water-reactive polyurethane system instead.
Is the crack through-and-through? In an RCC slab, check both faces — the top surface and the soffit (underside). If the same crack is visible on both faces, it has penetrated the full depth of the slab, not just the top layer. This changes the treatment plan: a through crack cannot be sealed by working the top face alone, since the bottom half of the crack plane stays untreated and remains a path for water and further movement. Confirming a through crack at this stage is what tells the crew in Step 3 to plan for injection and sealing from both faces, not one.
Which element is it in? This is the question the classic version of this guide skipped, and it decides as much as the width does. A hairline crack in a terrace slab and a hairline crack in a plastered wall are not the same repair, even at the same width — the slab is solid reinforced concrete the resin can actually penetrate; the wall is often a thin render coat over masonry with nothing behind it for a resin to key into. The section below answers this directly before the injection steps, so nothing gets injected that shouldn't be, and nothing in a beam or column gets treated as a cosmetic fix when it isn't one.
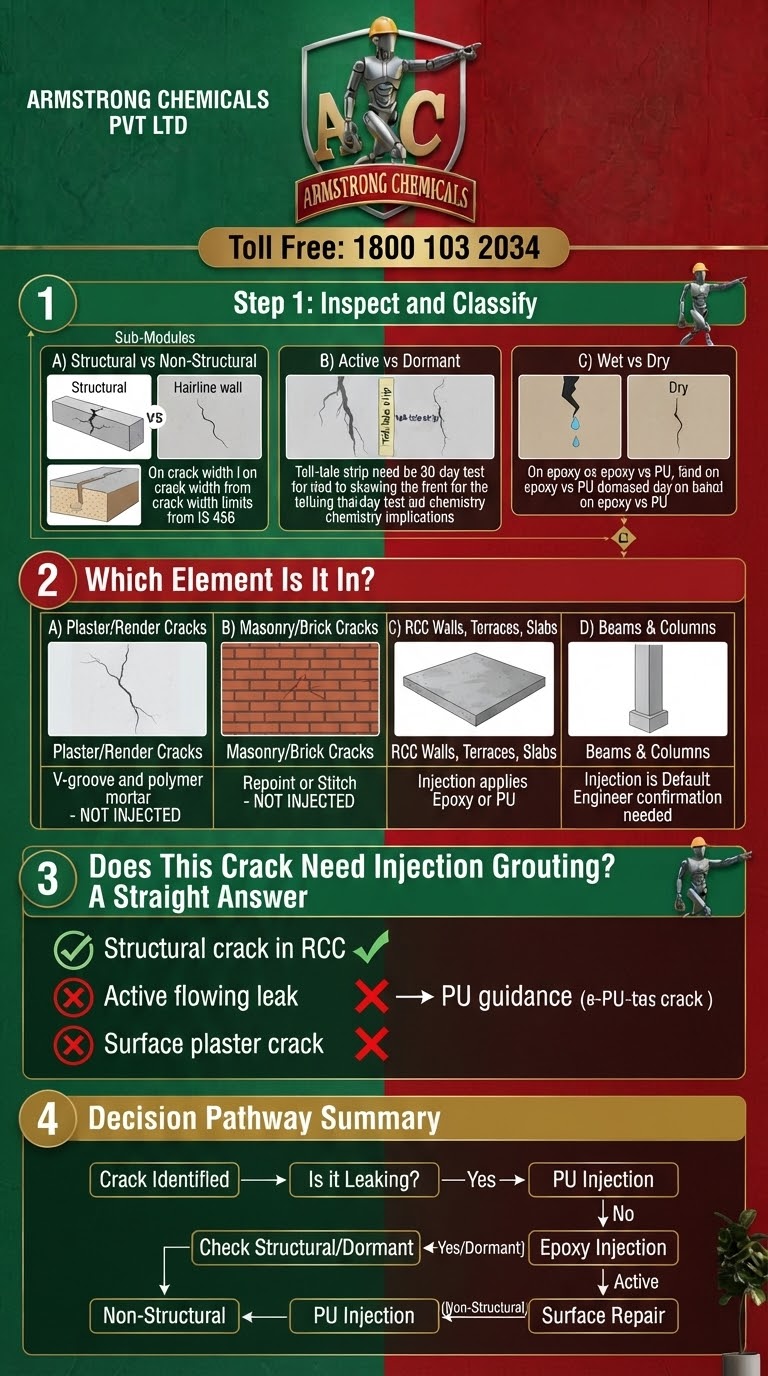
Does This Crack Need Injection Grouting? A Straight Answer
Injection grouting — epoxy or PU, pumped through packers under pressure — is built for one situation: a crack running through a solid mass of reinforced concrete, where the resin needs to travel and fill a plane deep inside the member. That describes a terrace, a slab, an RCC wall, and a beam or column. It does not describe most of what actually cracks on a wall.
Plaster and render cracks on walls — not injected. The great majority of cracking people point to on interior and exterior walls is in the plaster or render skim, not the structure behind it — shrinkage, thermal movement, or a thin coat applied over an uneven surface. There is no meaningful depth of solid material for a resin to penetrate, so pumping epoxy or PU into a plaster crack does nothing useful; it either refuses to take up the grout or seals a surface hairline that was never a structural issue. These are treated by opening the crack into a shallow V-groove (roughly 5mm), priming, and packing with a fibre-reinforced polymer repair mortar — see "Interior and Exterior Walls" below.
Masonry and brick wall cracks — repointed or stitched, not resin-injected. A crack running through brick or block masonry and its mortar joints behaves differently again: the joints don't hold injection pressure the way a solid concrete section does, so the standard fix is raking out the old mortar and repointing with fresh, polymer-modified mortar. Where the crack reflects genuine structural movement — a settlement crack, a crack that keeps reopening after repointing — the masonry gets crack-stitched: reinforcing bars set into chased slots across the crack line and bonded in with an epoxy anchoring compound, tying the wall back into one structural unit before it's repointed over. This is a specialist masonry-repair technique, not a resin-injection job.
RCC walls, terraces and slabs — injection applies. Where the wall or floor is reinforced concrete rather than plastered masonry, and the crack is genuinely structural or actively leaking, injection is the right tool — epoxy for a dormant structural crack, PU for an active leak — exactly as described in Step 3 below.
Beams and columns — injection is the default, once an engineer confirms it. These are load-bearing, reinforced members, so a crack here is a structural question first, almost always, not a cosmetic one. Once the crack is confirmed dormant and dry, epoxy injection is the standard repair — see "Beams and Columns" below for the diagnostic signs specific to these members and what changes when corrosion, not just cracking, is the underlying problem.
The one exception that cuts across all of this: an active, flowing leak. Whatever the element — even a wall — a crack that is actively leaking water gets stopped with water-reactive PU injection first, because there is no repair mortar or coating that will hold against live water pressure. Everything else above assumes the crack is not actively leaking; if it is, jump to the PU injection guidance in Step 3 regardless of which element it's in.
Step 2 — Prepare the Crack: Grooving and Cleaning
The steps below apply wherever injection grouting is the right tool — terraces, slabs, RCC walls, and beams or columns. (For plaster and masonry wall cracks, skip to "Interior and Exterior Walls" below — a V-groove and repair mortar, not injection preparation, is what those need.) Preparation decides whether the injected material actually reaches and fills the crack, or simply seals the surface while the defect underneath stays open.
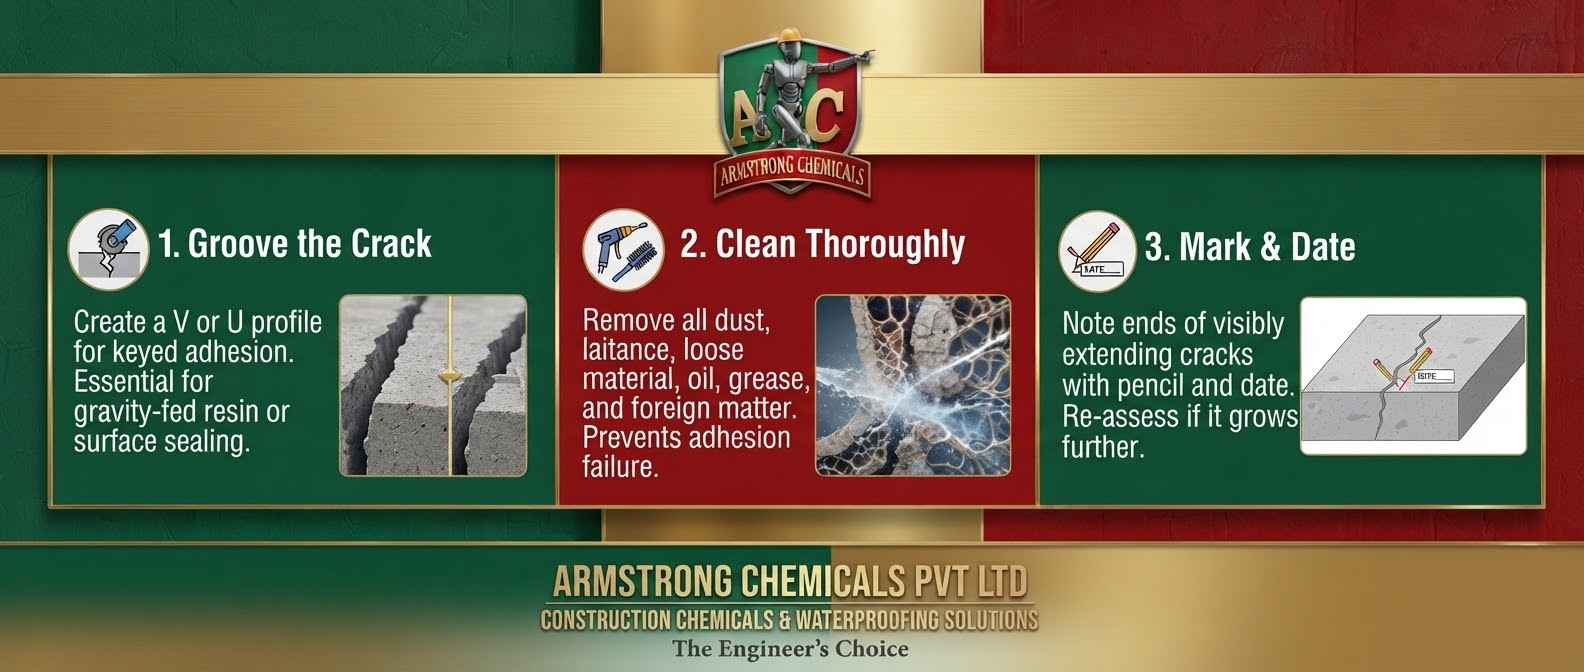
- Groove the crack in a V or U profile where the repair calls for surface sealing or gravity-fed resin rather than pressure injection — this gives the sealant or mortar a keyed section to grip, rather than a flat, shallow surface it can shear off.
- Clean thoroughly. Dust, laitance, loose material, oil, grease and any foreign matter block adhesion and prevent the resin from penetrating the crack's fine capillary structure. Clean with compressed air, wire brushing or, on larger jobs, high-pressure water jet or grit blasting.
- Mark and date growing cracks. If a crack is still visibly extending, note both ends with a pencil and date. A crack that grows further before repair work begins needs re-assessment, not a repair proceeding on stale information.
Step 3 — Inject: Epoxy for Structure, PU for Water-Bearing Cracks
This is where the classification from Step 1 becomes a product decision. The rule that prevents most site mistakes: PU for water, epoxy for structure.
Epoxy injection grout — for restoring structure. Where the crack is dormant and dry, and the objective is to make the member structurally whole again, epoxy is the correct answer. RAPIDSTRONG GROUT EP 403 is a two-component, low-viscosity, free-flow epoxy grout complying with ASTM-C-881-78, reaching up to 91 N/mm² compressive strength at 7 days in its aggregate-filled formulation, with a 60-minute pot life at 27±2°C. Its high capillary action lets it penetrate deep into fine cavities, and three separate formulations cover everything from hairline gaps of 0.1mm through 10mm gaps up to aggregate-filled pours of 70mm and beyond. Injecting epoxy into a wet, active leak wastes the material — it cannot cure properly against running water, and the repair fails from day one.
Water-reactive PU grout — for stopping water now. This is the product for an active, flowing leak, or a crack where dampness cannot be dried out before the repair. RAPIDSTRONG GROUT PU reacts with the water it meets, expanding into a closed-cell foam and solidifying within 0.6–0.8 minutes (36–48 seconds) of water contact — even against active hydraulic pressure, so the leak does not need to be blocked first. It is non-toxic and non-polluting, with no effect on potable water or marine life, and solidifies even in seawater or mildly acidic or alkaline water. Where no water is naturally present at the injection point, water is added manually to trigger the reaction. Injecting PU into a dormant, dry structural crack restores no strength — it is the wrong tool there, just as epoxy is the wrong tool in an active leak.
The injection method itself follows the same sequence for both chemistries:
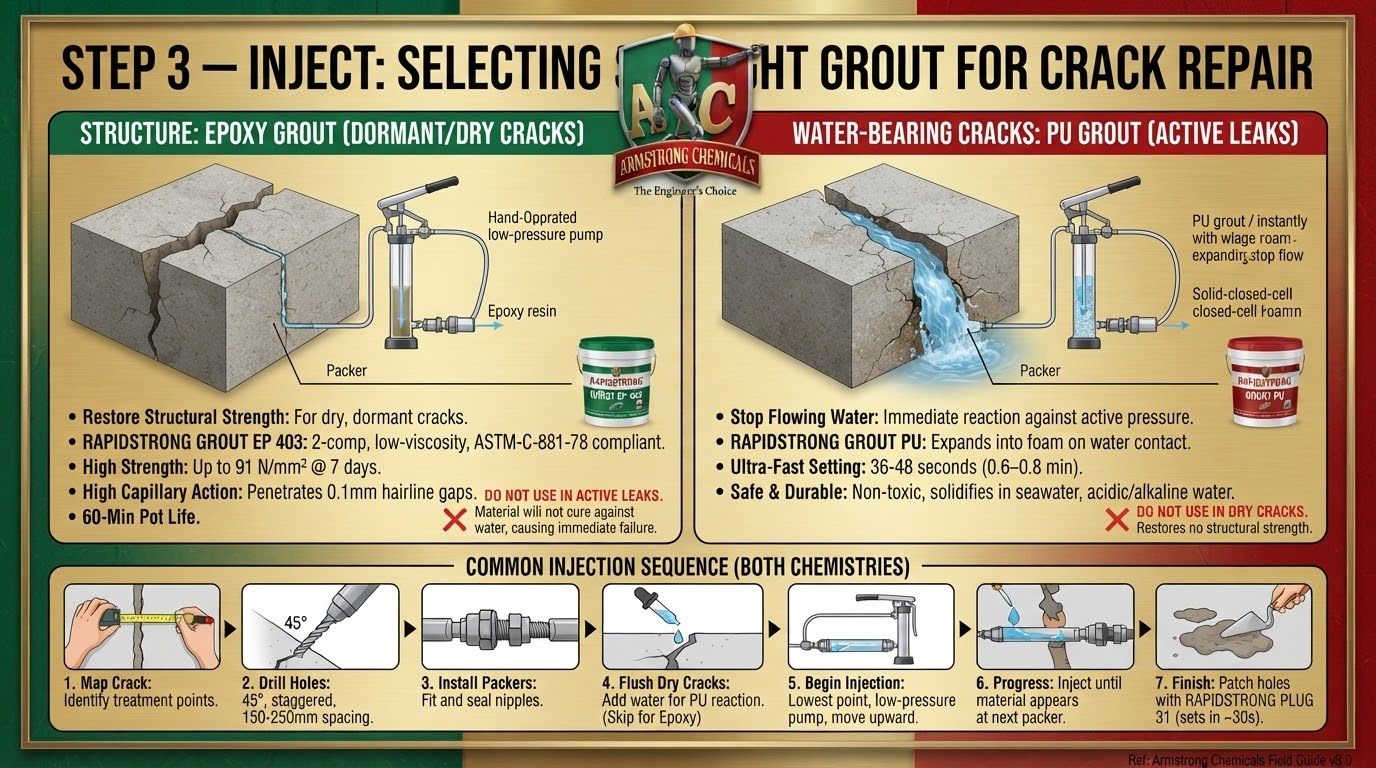
- Map the crack and identify all points requiring treatment.
- Drill injection holes at appropriate spacing — typically at roughly 45°, so the hole crosses the crack mid-depth, staggered on either side and spaced about 150–250mm apart depending on member thickness.
- Fit packers or nipples into the drilled holes and tighten to seal.
- If using a water-reactive PU grout on a dry crack, flush with water first to initiate the reaction; epoxy requires the opposite — a fully dry crack.
- Begin injection from the lowest packer, working upward, using a low-pressure hand-operated pump; higher-pressure pumps with specialised packers handle conditions that need it.
- Continue injecting until resin or grout appears at the next packer, then move up and repeat.
- Once fully sealed, cease injection, remove the packer stems, and patch the holes flush with a fast-setting mortar such as RAPIDSTRONG PLUG 31, which sets in approximately 30 seconds — the product to reach for wherever water is coming through right now and needs immediate stoppage.
Through cracks in an RCC slab — treat both faces. Where Step 1 confirms a crack runs the full depth of the slab (visible on both the top surface and the soffit), injecting from the top face alone is not enough — the bottom half of the crack plane stays unsealed and the repair fails from below even though the top looks complete. For a through crack:
- Drill and fit packers on both faces — top and soffit — not just the top.
- On each face, stagger the packers in a zig-zag (alternating) pattern across the crack rather than a single straight row. A staggered layout gives the injected resin or grout better lateral spread through the slab thickness and closes the gaps a single-row pattern can leave at mid-depth.
- Inject from the top face first, then repeat the same bottom-up injection sequence from the soffit, so the crack plane is saturated from both directions rather than relying on the top injection to migrate all the way through on its own.
- Apply the sealer or crystalline treatment (Step 4) on the soffit face as well as the top — a through crack that is only sealed on top can still weep or show efflorescence on the underside.
Beams and Columns: A Different Standard of Care
A crack in a beam or column is not treated the way a crack in a wall or terrace is, because these are the members actually carrying the building's load — a crack here can mean the member's structural continuity is compromised, not just that its surface looks bad. Three signs push a beam or column crack straight to an engineer's assessment before any repair chemistry is chosen:
- Diagonal cracking, running at an angle rather than straight up-down or across — this pattern typically indicates shear stress, a different structural mechanism from the straight flexural cracking that shows up on the tension face of a loaded beam.
- Visible deflection or sagging, where the member itself has moved, not just cracked at the surface.
- Rust staining or spalling concrete around the crack — this is corrosion, not simple cracking, and it changes the entire repair sequence (see below).
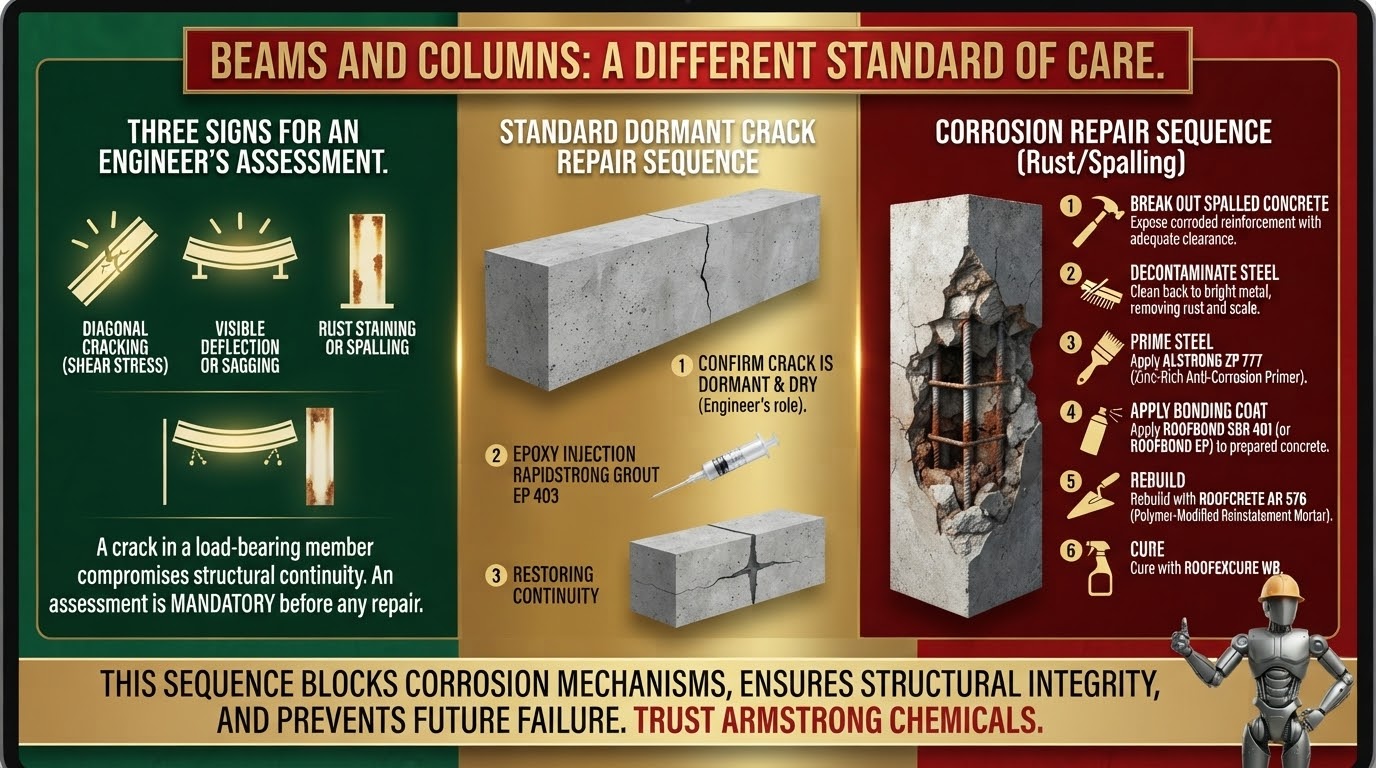
Once the crack itself is confirmed dormant and dry, epoxy injection with RAPIDSTRONG GROUT EP 403 is the standard repair — the same product and injection method described in Step 3, restoring structural continuity across the crack plane. This is specified only after an engineer has confirmed the crack is dormant; injecting a rigid epoxy into a beam or column that is still actively moving under load is a repair that fails on its own logic.
Where there's rust staining or spalling, the crack is a symptom of corrosion, and injection grout alone does not fix that. Reinforcement corrodes because carbonation or chloride ingress has reached the steel, and the fix has to address the steel and the concrete cover around it, not just the crack line on the surface. Armstrong's documented sequence for this:
- Break out the spalled or hollow-sounding concrete back to sound material, exposing the corroded reinforcement with adequate clearance behind the bar.
- Decontaminate the exposed steel — clean back to bright metal, removing rust and scale.
- Prime the steel with ALSTRONG ZP 777, a zinc-rich, galvanic anti-corrosion primer — the zinc acts as a sacrificial anode, protecting the steel electrochemically rather than just physically coating it.
- Apply a bonding coat — ROOFBOND SBR 401 or ROOFBOND EP — across the prepared concrete surface before the repair mortar goes on, so the new material bonds structurally to the old substrate instead of sitting on top of it as a patch. ROOFBOND EP is a two-component, solvent-free epoxy bonding agent (52 N/mm² compressive, 36 N/mm² flexural, to BS 6319) used as the mandatory primer partner ahead of structural mortar repairs; ROOFBOND SBR is the styrene-butadiene latex admixture used both as a bonding coat and mixed directly into the repair mortar itself.
- Rebuild with ROOFCRETE AR 576, Armstrong's polymer-modified structural reinstatement mortar — 48 N/mm² compressive and 9 N/mm² flexural strength at 28 days, with nil chloride ion diffusion and nil carbonation effect, so the repaired section actively blocks the two mechanisms that caused the corrosion in the first place rather than just patching over it. Apply in layers up to 20mm per pass for typical vertical sections (6–100mm total), or as the structural-grade reinstatement concrete variant where a column or beam needs more than 50mm of cover restored and vibrator compaction isn't practical.
- Cure with ROOFEXCURE WB rather than leaving the fresh mortar to dry naturally — the strength and low-permeability figures above only hold if the mortar is cured properly.
This sequence — not a surface patch, and not injection grout alone — is what Armstrong specifies wherever a beam or column crack comes with rust staining or spalling. It's covered in more depth in the companion piece on structural repair for aging institutional buildings.
Interior and Exterior Walls: When It's Not an Injection Job
Most of what actually shows up as "cracking" on a wall is not a job for injection grouting at all, and treating it as one wastes material and can miss what's really wrong. Two different substrates need two different fixes.
Plaster and render cracks — the most common case. Shrinkage cracking, thermal cracking, or a crack from an over-thin or poorly cured plaster coat: open the crack into a shallow V-groove (roughly 5mm), prime the groove, and pack it with a fibre-reinforced polymer repair mortar such as ROOFCRETE AR, or a site-batched repair mortar made by mixing ROOFBOND SBR 401 into cement mortar — both reach around 48 N/mm² compressive strength and bond well to a thin substrate in a way a rigid, unmodified cement patch does not. If the crack is still moving rather than dormant, a rigid mortar patch will simply crack again — use a flexible PU sealant such as ROOFEXSEAL PU 212 instead, which accommodates up to ±25% cyclic movement.
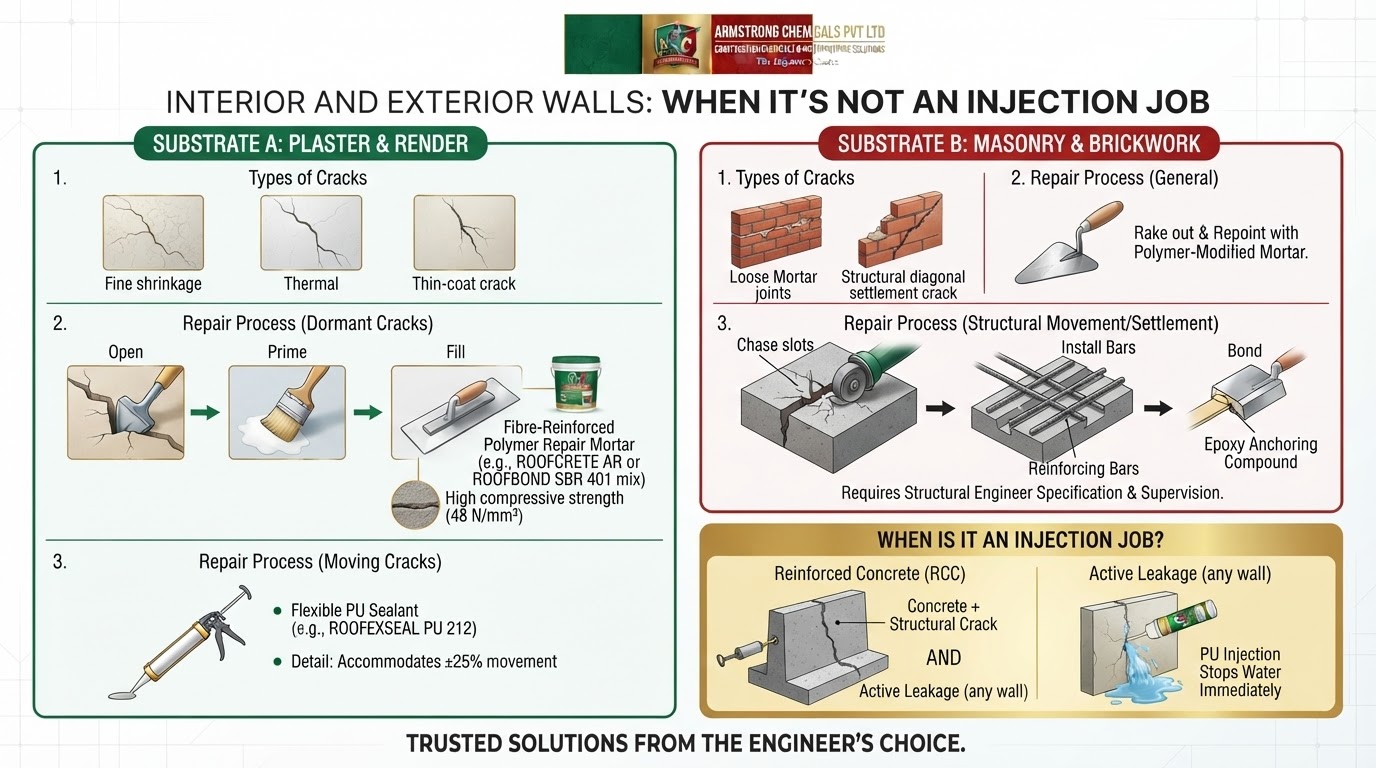
Masonry and brick wall cracks. Rake out the loose or cracked mortar joint and repoint with fresh, polymer-modified mortar. Where the crack reflects real structural movement in the wall — most often settlement — rather than simple joint deterioration, the wall is crack-stitched first: reinforcing bars set into slots chased across the crack line at regular vertical spacing, bonded in with an epoxy anchoring compound, which ties the masonry either side of the crack back into one structural unit before repointing goes over the top. This is standard masonry-repair engineering practice and should be specified and supervised by a structural engineer for any wall showing genuine movement, not applied as a routine fix for ordinary settlement hairlines.
When a wall crack does need injection. Two situations move a wall crack back into the injection workflow above: the wall is reinforced concrete (an RCC retaining wall, shear wall or structural wall) rather than plastered masonry and the crack is confirmed structural, or the crack — in any wall — is actively leaking, in which case PU injection stops the water regardless of what the wall is built from.
Step 4 — Apply Crystalline Treatment Where Self-Sealing Protection Is Needed
Once active leaks are stopped and structural cracks are injected, the surrounding concrete often still needs protection against the capillary porosity that let water find the crack in the first place — particularly on the negative (inside) face of basements, sumps, lift pits and water-retaining structures, where hydrostatic pressure would simply push a surface coating off the wall.
ROOFEX COP is Armstrong's crystalline osmotic waterproofing coating, complying with ASTM C 1202. It reacts with the concrete's own residual moisture and un-hydrated cement particles, growing insoluble, needle-like crystals that penetrate deep into the pore structure and seal hairline cracks up to 0.4mm from within the concrete mass itself — not as a layer sitting on the surface. Because crystallisation restarts whenever new moisture reaches it, the treatment is self-healing over the life of the structure, and it works against pressure from either face. Apply as a two-coat slurry at 0.5–0.75 kg/m² per coat, on a surface brought to saturated-surface-dry condition.
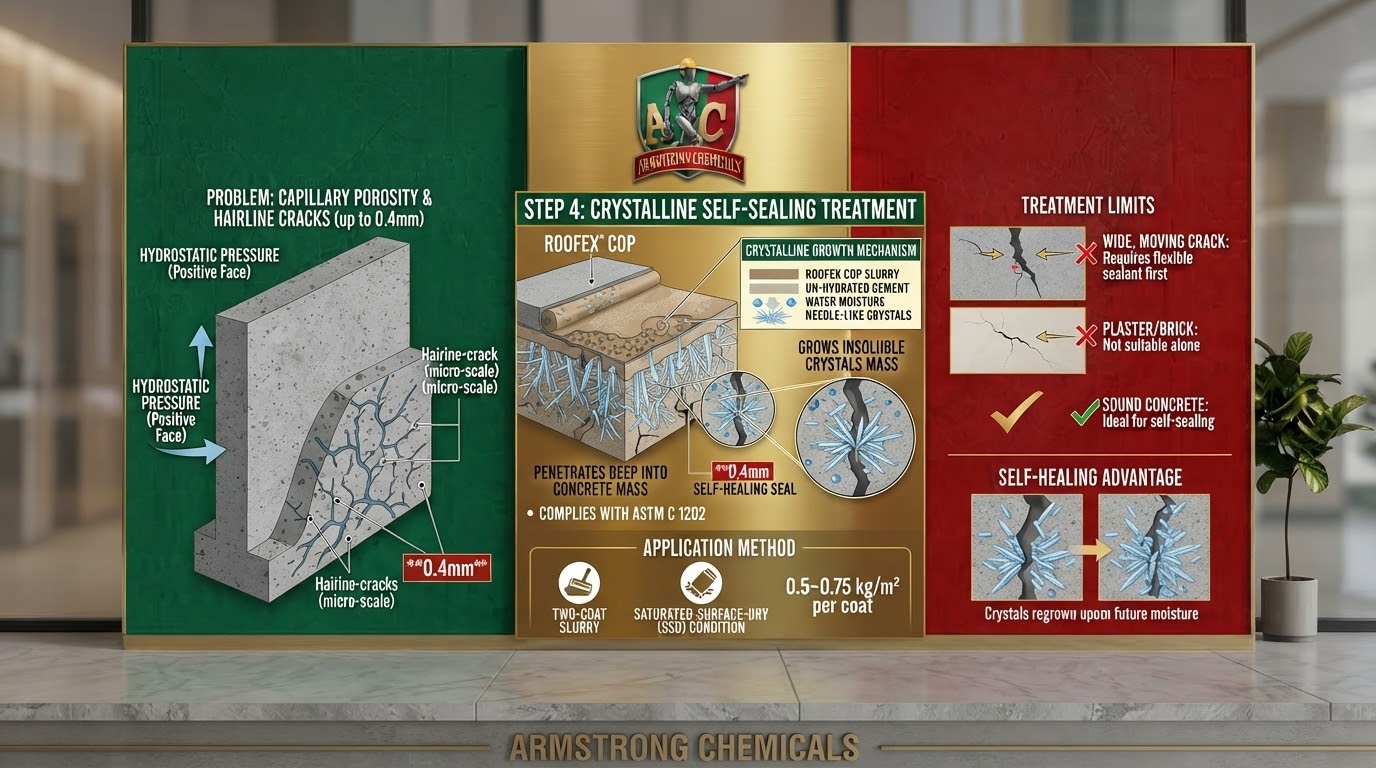
Crystalline treatment has real limits: it is rigid by chemistry and cannot bridge a crack that is still moving or wider than its sealing range, and it needs sound concrete to diffuse into — it is not a treatment for plaster, brick or masonry on its own. Where the crack is still active or wider than 0.4mm, injection or a flexible sealant comes first; crystalline treatment then seals the surrounding porosity so water does not simply find a new path around the repair.
Step 5 — Coat the Surface to Bridge Future Movement
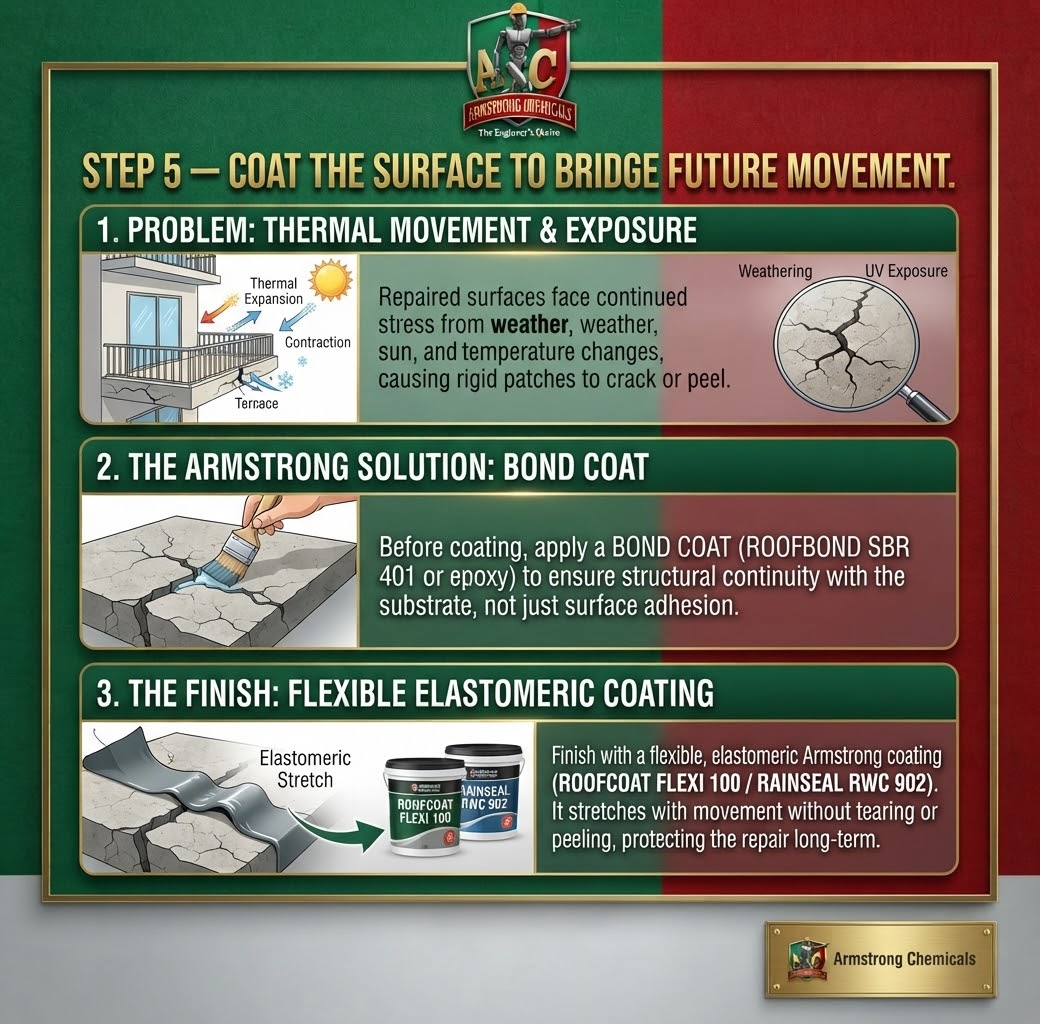
Where the repaired surface will face continued thermal movement, weathering or UV exposure — terraces, external walls, balconies — a flexible membrane or elastomeric coating over the repair protects it going forward. Armstrong's polymer-modified cementitious and acrylic elastomeric ranges, such as ROOFCOAT FLEXI 100 and RAINSEAL RWC 902, are built to stretch across thermal expansion and contraction without tearing or peeling, unlike a rigid patch left exposed on its own. Bonding a repair mortar or coating onto the prepared crack should always follow through a proper bond coat — ROOFBOND SBR 401 or an epoxy bonding agent, depending on the loading the repaired area will see — so the new material becomes structurally continuous with the substrate rather than simply sitting on top of it.
Step 6 — Cure and Test Before Handover
No repair is finished at the point the last coat goes on. Curing gives the injected resin, mortar or coating time to develop its full strength and bond — rushing this step is one of the most common reasons a repair that looked complete fails within months.
- Moist-cure crystalline and cementitious repairs with a fine mist several times a day for 2–3 days, or per the specific product's technical data sheet.
- Flood-test wet areas — terraces, bathrooms, tank interiors and any surface meant to hold or shed standing water — before handover, and confirm there is no fresh seepage.
- Re-verify after the next heavy rain on external repairs where a flood test on a dry day cannot fully replicate monsoon loading.
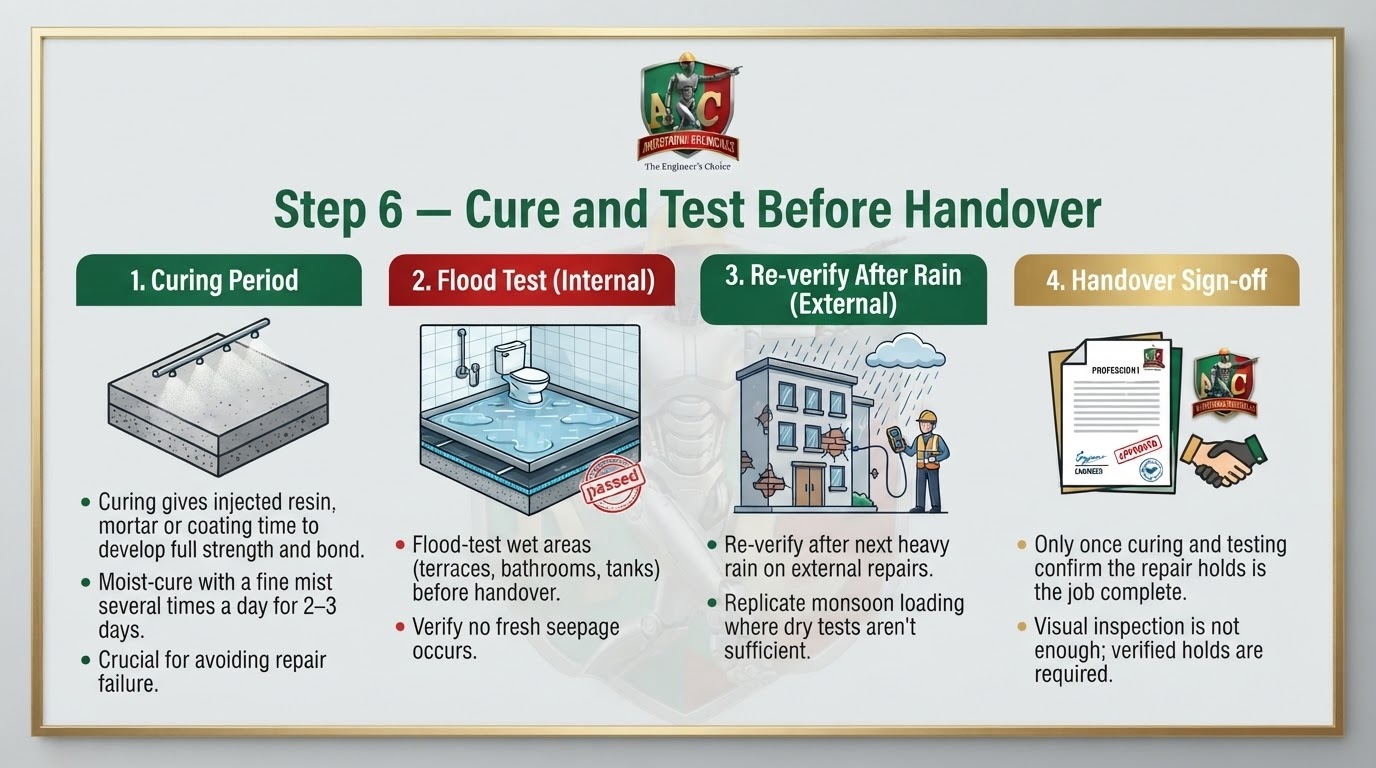
Only once curing and testing confirm the repair holds is the job actually complete — a repair that "looks dry" the day the crew leaves site is not the same as one that has been verified to hold.
Related Reading
- Spider-Web Cracks on Concrete Roads: Why the Cement Paste Debonds & How to Fix It — surface disturbance and repair depth.
- Types of Waterproofing Chemicals: A Manufacturer's Guide — the pillar page's crystalline treatment and injection grouts sections.
Talk to a Specialist — Free Site Visit
Frequently Asked Questions
By BN Rao, Armstrong Chemicals
Armstrong Chemicals Pvt Ltd — Construction & Waterproofing Chemicals, Bengaluru
An ISO 9001:2015 Certified Company
Technical Support: 98491 55533 / 99591 55533 | Toll Free: 1800 103 2034
armstrongchemicals.com
© 2026 Armstrong Chemicals Pvt Ltd. All rights reserved.